How to Build a Stone Beach Grill

Every summer, my aunt Laura heads to Block Island, husband and kids in tow, for a few weeks of sun. They seem to pick up new tag-alongs each year, so that now, fifteen years into the tradition, their beach crew through the weeks numbers around 50 friends and family members, many of whom have been coming almost as long as Laura has.

This year I joined Laura for the first time, and I had plenty of catching up to do on the cultures and practices of a Rhode Island beach vacationeer. "Belly bomb" doughnuts by the pier, Disco Night at Captain Nick's, karaoke at Club Soda, mid-week martini nights at the swanky beachside hotel, dancing to reggae music in a crowded bar on a Sunday afternoon with my nearly-80-year-old grandfather. But my favorite days were those where time fell into a kind of ocean rhythm: beach in the morning, a lazy lunch, a beachside cookout in the evening, several cocktails in the later evening, fall asleep, repeat.

It's the beachside cookout that really anchors the day, with vegetables, seafood, and meat cooked to charred perfection on a sand and stone-crafted beach grill that we built each night and then dismantled. The design of the beach grill developed out of necessity: Aunt Laura began grilling on the beach when she first started coming to Block Island. Back then, she'd cart a hibachi from the beach house to the truck to the sand, and back again. What began as simple hot dogs and hamburgers evolved into unabashedly gourmet meals, complete with fruit and cheese, flowers and candles, marinated lamb, chicken fajitas, clams, corn on the cob — all served from towel-draped boogie board tables and driftwood benches.

Grilling on the beach.

Eventually Laura realized that they didn't need to lug the whole grill to the beach, especially when she had her hands full with so much food. Block Island beaches have beautiful rocks, why not line a hole with rocks and lay the grill-top over it? After the first beach grill was born, it soon became everybody's favorite way to eat. Dads and uncles dig the hole, cousins collect the stones and driftwood, and everybody takes a turn manning the grill. The building process can take anywhere from 15 minutes to a whole afternoon, depending on how fancy you get and how many hands are on deck.

To Build a Beach Grill

Supplies
A shovel
Large beach stones
Coals or dry driftwood
Matches
A metal grill top large enough to cover the hole
Grill tools like tongs and forks
A bucket for cleanup

Method
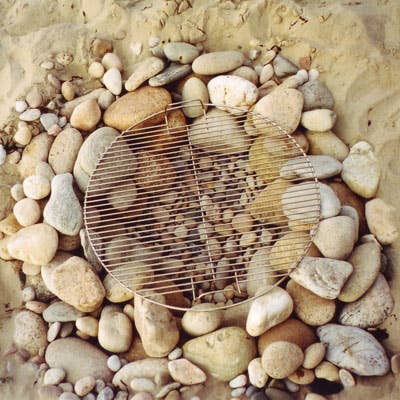
Dig a shallow, bowl-shaped hole in the sand about 2 feet in diameter. Dampen the bowl with sea water (here's where your bucket can come in handy) and smooth the edges. Line the basin completely with stones found on the beach; top with larger stones to craft a rim for your grill grate to sturdily sit atop. Arrange smaller stones and shells around the outside of the grill to clearly mark the area around the grill, and to help keep sand from getting close to your food. Pile coals or found driftwood into the stone-lined basin and light with a match. Place the grill on top, wait for the heat to reach the right temperature, and get cooking!

Clean-up is relatively simple: remove the grill top and, using your bucket, pour lots of seawater over the coals until they are completely out. Remove the coals and discard, then fill in the hole with sand so nobody falls in. Laura warns that cleaning up the party is much harder (especially in the dark) than cleaning up the actual grill.

Note: Check your local fire-safety laws in case you need a permit to grill on the beach.

Techniques

How to Build a Stone Beach Grill

By Cory Baldwin


Published on September 2, 2011

Every summer, my aunt Laura heads to Block Island, husband and kids in tow, for a few weeks of sun. They seem to pick up new tag-alongs each year, so that now, fifteen years into the tradition, their beach crew through the weeks numbers around 50 friends and family members, many of whom have been coming almost as long as Laura has.

This year I joined Laura for the first time, and I had plenty of catching up to do on the cultures and practices of a Rhode Island beach vacationeer. "Belly bomb" doughnuts by the pier, Disco Night at Captain Nick's, karaoke at Club Soda, mid-week martini nights at the swanky beachside hotel, dancing to reggae music in a crowded bar on a Sunday afternoon with my nearly-80-year-old grandfather. But my favorite days were those where time fell into a kind of ocean rhythm: beach in the morning, a lazy lunch, a beachside cookout in the evening, several cocktails in the later evening, fall asleep, repeat.

It's the beachside cookout that really anchors the day, with vegetables, seafood, and meat cooked to charred perfection on a sand and stone-crafted beach grill that we built each night and then dismantled. The design of the beach grill developed out of necessity: Aunt Laura began grilling on the beach when she first started coming to Block Island. Back then, she'd cart a hibachi from the beach house to the truck to the sand, and back again. What began as simple hot dogs and hamburgers evolved into unabashedly gourmet meals, complete with fruit and cheese, flowers and candles, marinated lamb, chicken fajitas, clams, corn on the cob — all served from towel-draped boogie board tables and driftwood benches.

Grilling on the beach.

Eventually Laura realized that they didn't need to lug the whole grill to the beach, especially when she had her hands full with so much food. Block Island beaches have beautiful rocks, why not line a hole with rocks and lay the grill-top over it? After the first beach grill was born, it soon became everybody's favorite way to eat. Dads and uncles dig the hole, cousins collect the stones and driftwood, and everybody takes a turn manning the grill. The building process can take anywhere from 15 minutes to a whole afternoon, depending on how fancy you get and how many hands are on deck.

To Build a Beach Grill

Supplies
A shovel
Large beach stones
Coals or dry driftwood
Matches
A metal grill top large enough to cover the hole
Grill tools like tongs and forks
A bucket for cleanup

Method
Dig a shallow, bowl-shaped hole in the sand about 2 feet in diameter. Dampen the bowl with sea water (here's where your bucket can come in handy) and smooth the edges. Line the basin completely with stones found on the beach; top with larger stones to craft a rim for your grill grate to sturdily sit atop. Arrange smaller stones and shells around the outside of the grill to clearly mark the area around the grill, and to help keep sand from getting close to your food. Pile coals or found driftwood into the stone-lined basin and light with a match. Place the grill on top, wait for the heat to reach the right temperature, and get cooking!

Clean-up is relatively simple: remove the grill top and, using your bucket, pour lots of seawater over the coals until they are completely out. Remove the coals and discard, then fill in the hole with sand so nobody falls in. Laura warns that cleaning up the party is much harder (especially in the dark) than cleaning up the actual grill.

Note: Check your local fire-safety laws in case you need a permit to grill on the beach.

Continue to Next Story

Want more SAVEUR?

Get our favorite recipes, stories, and more delivered to your inbox.