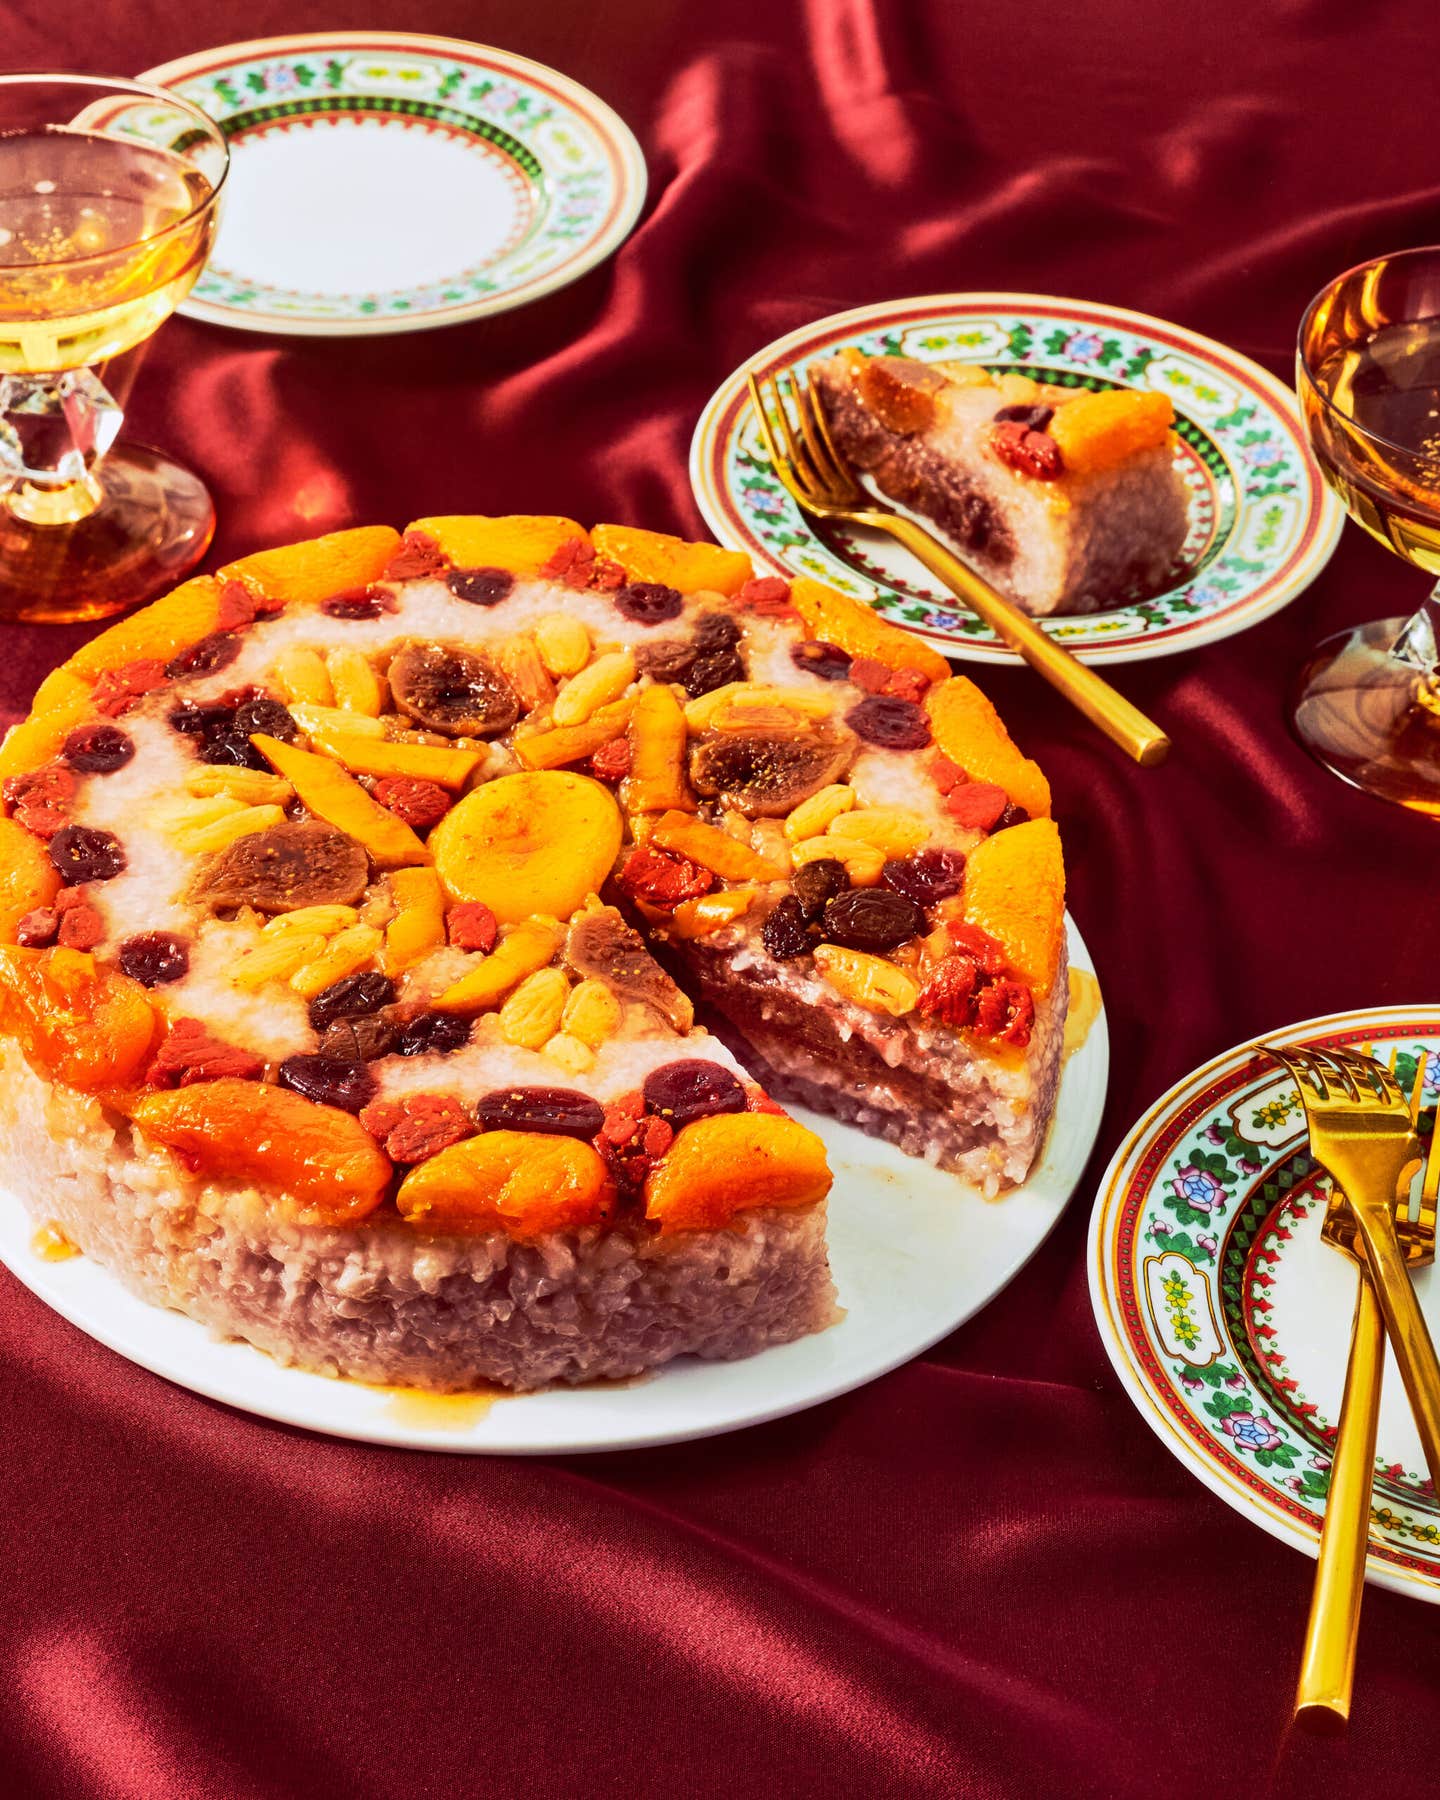
Ba Bao Fan (Eight Treasure Rice Cake)Crowned with a ring of plump and glossy dried fruits, this riff on a classic Chinese dessert is a true showstopper.

“Every Lunar New Year, my mom will make ba bao fan, a Chinese steamed glutinous rice pudding with a ribbon of creamy red bean filling running through the middle. Ba bao fan, which roughly translates to ‘eight treasures rice,’ is a very auspicious and traditional dessert. The namesake eight treasures—a mixture of candied and dried fruits, nuts, and seeds—ensures wealth and prosperity in the new year, so my mom never skimped on the ring of goji berries, dates, cranberries, pumpkin seeds, walnuts, figs, and mango that lined her cake pan. Over the years, I’ve made her recipe my own with little tweaks, like flavoring the glutinous sweet rice with dried hibiscus flowers, folding a bit of butter and five-spice powder into the sweetened adzuki beans, and last but not least, brushing that showstopping crown of dried fruits with a tart, glossy syrup.” —Natasha Pickowicz, New York City pastry chef and More Than Cake author.

  • Makes

    One 8-inch cake

  • Time

    1 hour 30 minutes, plus chilling

Ingredients

For the hibiscus rice:

  • 2 cups uncooked Japanese sweet rice (sometimes labeled mochi gome or glutinous rice)
  • ¼ cup dried hibiscus flowers
  • 1 tsp. olive oil
  • 1 tsp. kosher salt

For the red bean filling:

  • One 16-oz. can sweetened adzuki bean paste
  • 2 Tbsp. unsalted butter, softened
  • 1 tsp. vanilla extract
  • ½ tsp. Chinese five-spice powder
  • ½ tsp. kosher salt, plus more if needed

For the candied fruit:

  • 1 cup sugar
  • 1 cup unsweetened dried mango strips
  • ½ cup assorted small dried fruits, such as apricots, currants, cranberries, figs, goji berries, jujubes, or raisins
  • Large pinch citric acid, for seasoning (optional)

For the cake:

  • Vegetable oil, for greasing
  • Flaky sea salt, for serving

Instructions

Step 1

Make the hibiscus rice: In a medium pot, stir together the rice, hibiscus, olive oil, salt, and 4½ cups of water. Bring to a boil over high heat, then turn the heat to low, cover the pot tightly, and simmer gently until most of the liquid is absorbed and the rice is tender, 28–30 minutes. Remove the pot from the heat and set aside to rest, covered, for 15 minutes, then discard the hibiscus. 

Step 2

Make the red bean filling: In a medium bowl, stir together the adzuki bean paste, butter, vanilla, five-spice powder, and salt until well combined. Taste and add more salt if needed. Set aside. 

Step 3

Make the candied fruit: To a small pot, add the sugar and 1 cup of water and bring to a boil over high heat. Turn the heat to medium-low, add the mango and assorted dried fruits, and simmer gently until the fruit is tender and the liquid is syrupy, 8–10 minutes. Turn off the heat and allow the fruit to cool in the syrup. Stir in the citric acid, if desired.

Step 4

Make the cake: Position a rack in the center of the oven and preheat to 325°F. Grease an 8-inch round cake pan with vegetable oil. 

Step 5

Using a slotted spoon, remove the candied fruit from the syrup, letting excess syrup drip back into the pot (reserve the syrup). Arrange the fruit on the bottom of the pan in a decorative design, fitting the pieces together snugly. Spoon half of the rice on top of the fruit, pressing it with lightly oiled fingertips so it sticks to the fruit and the sides of the pan. Spoon the red bean filling on top of the rice, leaving a 1-inch-wide border around the edges. Smooth the top with a small offset spatula or knife. Add the remaining rice on top and around the edges, sealing in the red bean filling. Smooth the top of the rice with the offset spatula, applying pressure to pack in the mixture. Cover the pan with aluminum foil or a lid.

Step 6

Place the covered cake pan in a pot or roasting pan large enough to leave at least a 1-inch clearance on all sides (such as a 9- by 13-inch pan). Fill the pot or pan with enough hot water to come halfway up the sides of the cake pan. Bake until the cake looks set, about 30 minutes.

Step 7

Allow the cake to cool completely in the pan in the water bath, then refrigerate the cake in the pan for at least 2 hours, or up to 24.

Step 8

  1. To unmold the cake, run a butter knife around the edges, then invert onto a serving plate and slowly remove the pan. Brush the surface of the cake with 2 tablespoons of the reserved fruit syrup. (The cake can be wrapped tightly in plastic and stored in the fridge for up to 3 days.)

Step 9

Sprinkle the cake with flaky sea salt, slice into wedges, and serve immediately.
  1. Make the hibiscus rice: In a medium pot, stir together the rice, hibiscus, olive oil, salt, and 4½ cups of water. Bring to a boil over high heat, then turn the heat to low, cover the pot tightly, and simmer gently until most of the liquid is absorbed and the rice is tender, 28–30 minutes. Remove the pot from the heat and set aside to rest, covered, for 15 minutes, then discard the hibiscus. 
  2. Make the red bean filling: In a medium bowl, stir together the adzuki bean paste, butter, vanilla, five-spice powder, and salt until well combined. Taste and add more salt if needed. Set aside. 
  3. Make the candied fruit: To a small pot, add the sugar and 1 cup of water and bring to a boil over high heat. Turn the heat to medium-low, add the mango and assorted dried fruits, and simmer gently until the fruit is tender and the liquid is syrupy, 8–10 minutes. Turn off the heat and allow the fruit to cool in the syrup. Stir in the citric acid, if desired.
  4. Make the cake: Position a rack in the center of the oven and preheat to 325°F. Grease an 8-inch round cake pan with vegetable oil. 
  5. Using a slotted spoon, remove the candied fruit from the syrup, letting excess syrup drip back into the pot (reserve the syrup). Arrange the fruit on the bottom of the pan in a decorative design, fitting the pieces together snugly. Spoon half of the rice on top of the fruit, pressing it with lightly oiled fingertips so it sticks to the fruit and the sides of the pan. Spoon the red bean filling on top of the rice, leaving a 1-inch-wide border around the edges. Smooth the top with a small offset spatula or knife. Add the remaining rice on top and around the edges, sealing in the red bean filling. Smooth the top of the rice with the offset spatula, applying pressure to pack in the mixture. Cover the pan with aluminum foil or a lid.
  6. Place the covered cake pan in a pot or roasting pan large enough to leave at least a 1-inch clearance on all sides (such as a 9- by 13-inch pan). Fill the pot or pan with enough hot water to come halfway up the sides of the cake pan. Bake until the cake looks set, about 30 minutes.
  7. Allow the cake to cool completely in the pan in the water bath, then refrigerate the cake in the pan for at least 2 hours, or up to 24.
    1. To unmold the cake, run a butter knife around the edges, then invert onto a serving plate and slowly remove the pan. Brush the surface of the cake with 2 tablespoons of the reserved fruit syrup. (The cake can be wrapped tightly in plastic and stored in the fridge for up to 3 days.)
  8. Sprinkle the cake with flaky sea salt, slice into wedges, and serve immediately.
Recipes

Ba Bao Fan (Eight Treasure Rice Cake)

Crowned with a ring of plump and glossy dried fruits, this riff on a classic Chinese dessert is a true showstopper.

  • Makes

    One 8-inch cake

  • Time

    1 hour 30 minutes, plus chilling

Ba Bao Fan (Eight Treasure Rice Cake)
PHOTO: DOAA ELKADY • FOOD STYLING: JASON SCHREIBER • PROP STYLIST: PAIGE HICKS

By Natasha Pickowicz


Published on December 23, 2024

“Every Lunar New Year, my mom will make ba bao fan, a Chinese steamed glutinous rice pudding with a ribbon of creamy red bean filling running through the middle. Ba bao fan, which roughly translates to ‘eight treasures rice,’ is a very auspicious and traditional dessert. The namesake eight treasures—a mixture of candied and dried fruits, nuts, and seeds—ensures wealth and prosperity in the new year, so my mom never skimped on the ring of goji berries, dates, cranberries, pumpkin seeds, walnuts, figs, and mango that lined her cake pan. Over the years, I’ve made her recipe my own with little tweaks, like flavoring the glutinous sweet rice with dried hibiscus flowers, folding a bit of butter and five-spice powder into the sweetened adzuki beans, and last but not least, brushing that showstopping crown of dried fruits with a tart, glossy syrup.” —Natasha Pickowicz, New York City pastry chef and More Than Cake author.

Ingredients

For the hibiscus rice:

  • 2 cups uncooked Japanese sweet rice (sometimes labeled mochi gome or glutinous rice)
  • ¼ cup dried hibiscus flowers
  • 1 tsp. olive oil
  • 1 tsp. kosher salt

For the red bean filling:

  • One 16-oz. can sweetened adzuki bean paste
  • 2 Tbsp. unsalted butter, softened
  • 1 tsp. vanilla extract
  • ½ tsp. Chinese five-spice powder
  • ½ tsp. kosher salt, plus more if needed

For the candied fruit:

  • 1 cup sugar
  • 1 cup unsweetened dried mango strips
  • ½ cup assorted small dried fruits, such as apricots, currants, cranberries, figs, goji berries, jujubes, or raisins
  • Large pinch citric acid, for seasoning (optional)

For the cake:

  • Vegetable oil, for greasing
  • Flaky sea salt, for serving

Instructions

Step 1

Make the hibiscus rice: In a medium pot, stir together the rice, hibiscus, olive oil, salt, and 4½ cups of water. Bring to a boil over high heat, then turn the heat to low, cover the pot tightly, and simmer gently until most of the liquid is absorbed and the rice is tender, 28–30 minutes. Remove the pot from the heat and set aside to rest, covered, for 15 minutes, then discard the hibiscus. 

Step 2

Make the red bean filling: In a medium bowl, stir together the adzuki bean paste, butter, vanilla, five-spice powder, and salt until well combined. Taste and add more salt if needed. Set aside. 

Step 3

Make the candied fruit: To a small pot, add the sugar and 1 cup of water and bring to a boil over high heat. Turn the heat to medium-low, add the mango and assorted dried fruits, and simmer gently until the fruit is tender and the liquid is syrupy, 8–10 minutes. Turn off the heat and allow the fruit to cool in the syrup. Stir in the citric acid, if desired.

Step 4

Make the cake: Position a rack in the center of the oven and preheat to 325°F. Grease an 8-inch round cake pan with vegetable oil. 

Step 5

Using a slotted spoon, remove the candied fruit from the syrup, letting excess syrup drip back into the pot (reserve the syrup). Arrange the fruit on the bottom of the pan in a decorative design, fitting the pieces together snugly. Spoon half of the rice on top of the fruit, pressing it with lightly oiled fingertips so it sticks to the fruit and the sides of the pan. Spoon the red bean filling on top of the rice, leaving a 1-inch-wide border around the edges. Smooth the top with a small offset spatula or knife. Add the remaining rice on top and around the edges, sealing in the red bean filling. Smooth the top of the rice with the offset spatula, applying pressure to pack in the mixture. Cover the pan with aluminum foil or a lid.

Step 6

Place the covered cake pan in a pot or roasting pan large enough to leave at least a 1-inch clearance on all sides (such as a 9- by 13-inch pan). Fill the pot or pan with enough hot water to come halfway up the sides of the cake pan. Bake until the cake looks set, about 30 minutes.

Step 7

Allow the cake to cool completely in the pan in the water bath, then refrigerate the cake in the pan for at least 2 hours, or up to 24.

Step 8

  1. To unmold the cake, run a butter knife around the edges, then invert onto a serving plate and slowly remove the pan. Brush the surface of the cake with 2 tablespoons of the reserved fruit syrup. (The cake can be wrapped tightly in plastic and stored in the fridge for up to 3 days.)

Step 9

Sprinkle the cake with flaky sea salt, slice into wedges, and serve immediately.
  1. Make the hibiscus rice: In a medium pot, stir together the rice, hibiscus, olive oil, salt, and 4½ cups of water. Bring to a boil over high heat, then turn the heat to low, cover the pot tightly, and simmer gently until most of the liquid is absorbed and the rice is tender, 28–30 minutes. Remove the pot from the heat and set aside to rest, covered, for 15 minutes, then discard the hibiscus. 
  2. Make the red bean filling: In a medium bowl, stir together the adzuki bean paste, butter, vanilla, five-spice powder, and salt until well combined. Taste and add more salt if needed. Set aside. 
  3. Make the candied fruit: To a small pot, add the sugar and 1 cup of water and bring to a boil over high heat. Turn the heat to medium-low, add the mango and assorted dried fruits, and simmer gently until the fruit is tender and the liquid is syrupy, 8–10 minutes. Turn off the heat and allow the fruit to cool in the syrup. Stir in the citric acid, if desired.
  4. Make the cake: Position a rack in the center of the oven and preheat to 325°F. Grease an 8-inch round cake pan with vegetable oil. 
  5. Using a slotted spoon, remove the candied fruit from the syrup, letting excess syrup drip back into the pot (reserve the syrup). Arrange the fruit on the bottom of the pan in a decorative design, fitting the pieces together snugly. Spoon half of the rice on top of the fruit, pressing it with lightly oiled fingertips so it sticks to the fruit and the sides of the pan. Spoon the red bean filling on top of the rice, leaving a 1-inch-wide border around the edges. Smooth the top with a small offset spatula or knife. Add the remaining rice on top and around the edges, sealing in the red bean filling. Smooth the top of the rice with the offset spatula, applying pressure to pack in the mixture. Cover the pan with aluminum foil or a lid.
  6. Place the covered cake pan in a pot or roasting pan large enough to leave at least a 1-inch clearance on all sides (such as a 9- by 13-inch pan). Fill the pot or pan with enough hot water to come halfway up the sides of the cake pan. Bake until the cake looks set, about 30 minutes.
  7. Allow the cake to cool completely in the pan in the water bath, then refrigerate the cake in the pan for at least 2 hours, or up to 24.
    1. To unmold the cake, run a butter knife around the edges, then invert onto a serving plate and slowly remove the pan. Brush the surface of the cake with 2 tablespoons of the reserved fruit syrup. (The cake can be wrapped tightly in plastic and stored in the fridge for up to 3 days.)
  8. Sprinkle the cake with flaky sea salt, slice into wedges, and serve immediately.

Continue to Next Story

Want more SAVEUR?

Get our favorite recipes, stories, and more delivered to your inbox.