Master Easter Bread with This Step-by-Step Guide
Our version of the whimsical Italian Easter classic tastes as good as it looks
Kat Craddock

By Kat Craddock


Published on April 19, 2019

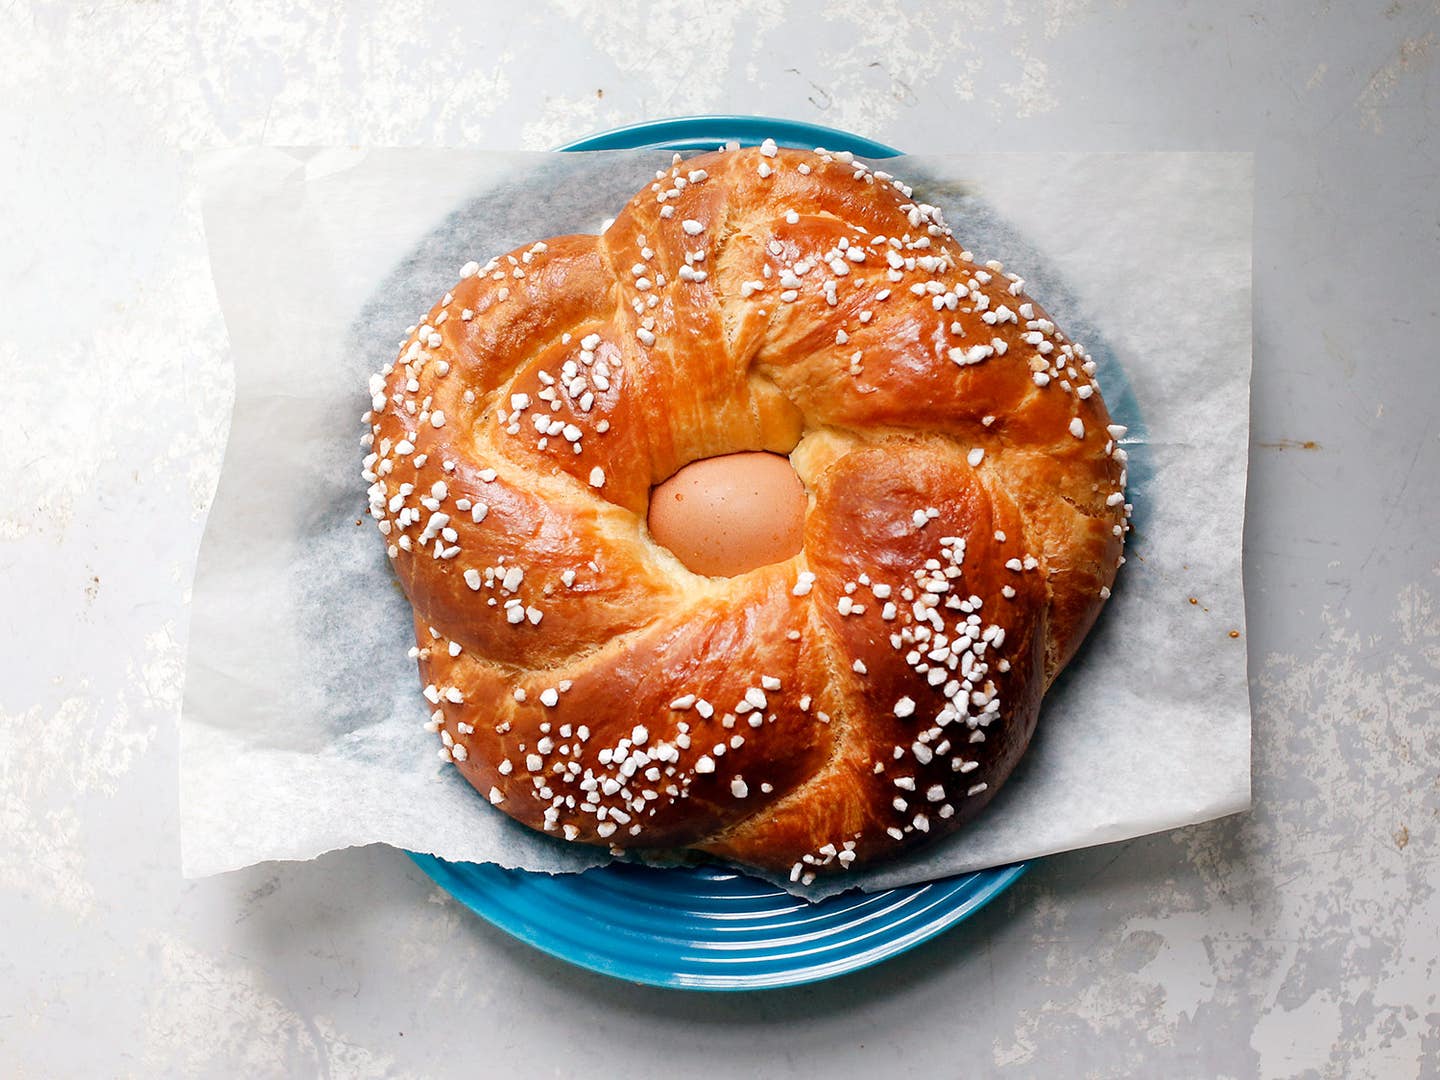
Easter baking in Italy means two things: savory pies and sweet breads. The pies can be filled with anything from Swiss chard to lamb to charcuterie and cheeses, but Italian Easter bread, known as pane di Pasqua, typically consists of a braided loaf with an egg peeking out. While we here at SAVEUR don't want to offend any nonne, the texture and flavor of these holiday breads often don't live up to their festive appearance. The dough either has too much yeast or sugar; or it doesn't have enough salt, eggs, or butter; or it was mixed and fermented too fast; or some combination of all of these things, yielding a loaf that's rock-hard on the outside and disappointingly dry and bland on the inside. But with the right dough, pane di Pasqua can graduate from an eye-catching centerpiece to a delicious bread in its own right. Follow the steps below to make an Easter bread that tastes as good as it looks.

Step 1: Start with Brioche Dough

Yes, we're technically using a French dough to make an Italian bread, and the recipe is adapted from an Australian bakery—the celebrated Bourke Street Bakery in Sydney—but hear us out. Brioche is in the same family as pane di Pasqua and challah but has a higher percentage of butter and eggs, yielding a pillowy, richly flavored loaf with a moist, tender crumb. Plus, the dough is super fun to work with, which is why it's the only bread I miss from my baking days. After the flour and eggs are transformed into a silky dough, a teaspoon of orange zest, almond extract, or anise seeds (or all three!) can be added at the same time as the butter, for depth of flavor. Just be sure not to go overboard with the flavorings or you'll veer into Christmas bread territory.

Step 2: Shape the Dough into Ropes
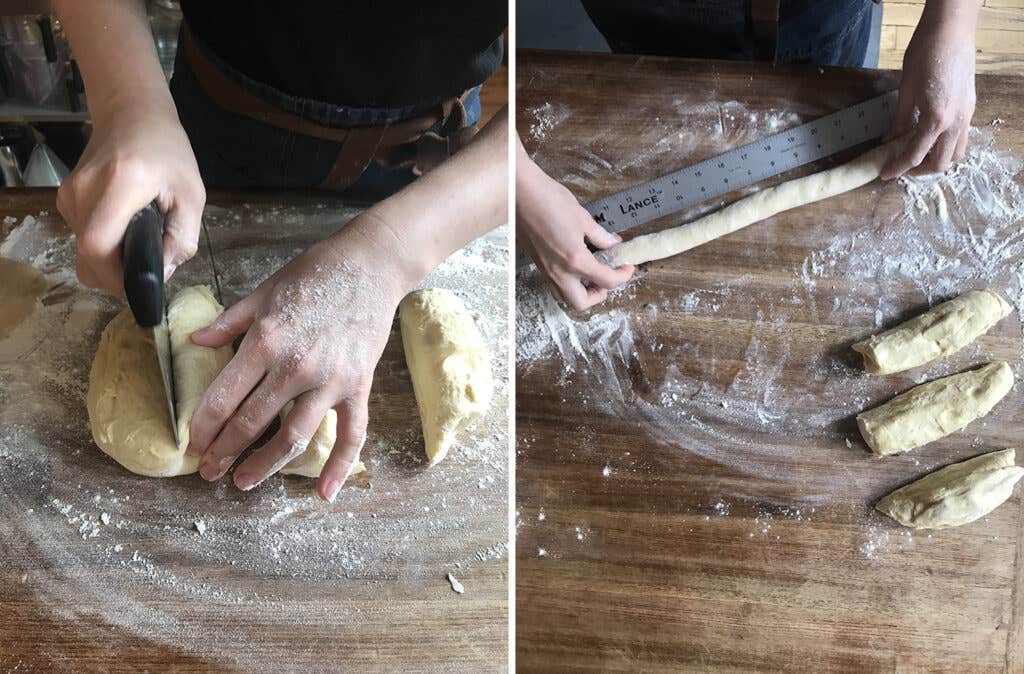
cutting and shaping easter bread dough
After fermenting the dough overnight in the refrigerator, lightly flour a large work surface. Turn the dough out onto it and divide into 4 even strips. Shape the strips into even ropes, each about 1 inch thick and 15 inches long. Each wreath will be formed using 2 ropes. Take note that the amount of flour you use can affect your results. A little bit is helpful, but if there’s too much flour on your work surface, you won't be able to use the friction against the table to extend the dough out into a nice rope. ¼ cup of flour total on your work surface and hands should be plenty.

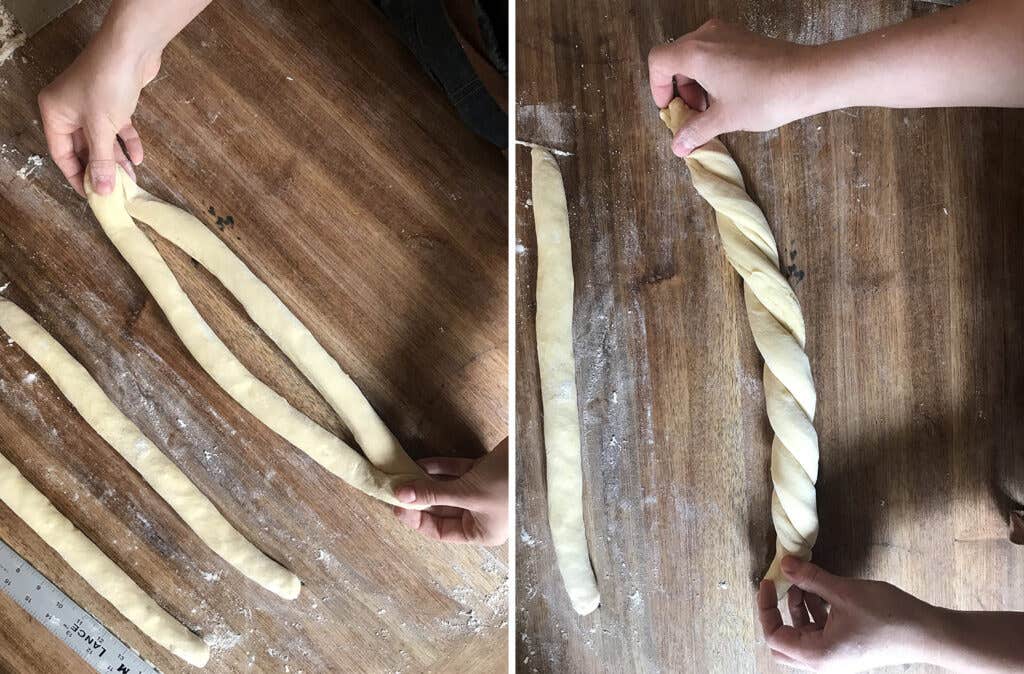
Step 3: Twist the Ropes into Braids

twisting easter bread dough
Pinch 2 ropes together at both ends, then twist several times to make a tight coil. Make sure the dough is still cold enough: if it starts getting sticky and smearing your work surface, that means the butter is starting to melt. Throw the dough back in the fridge to firm up.

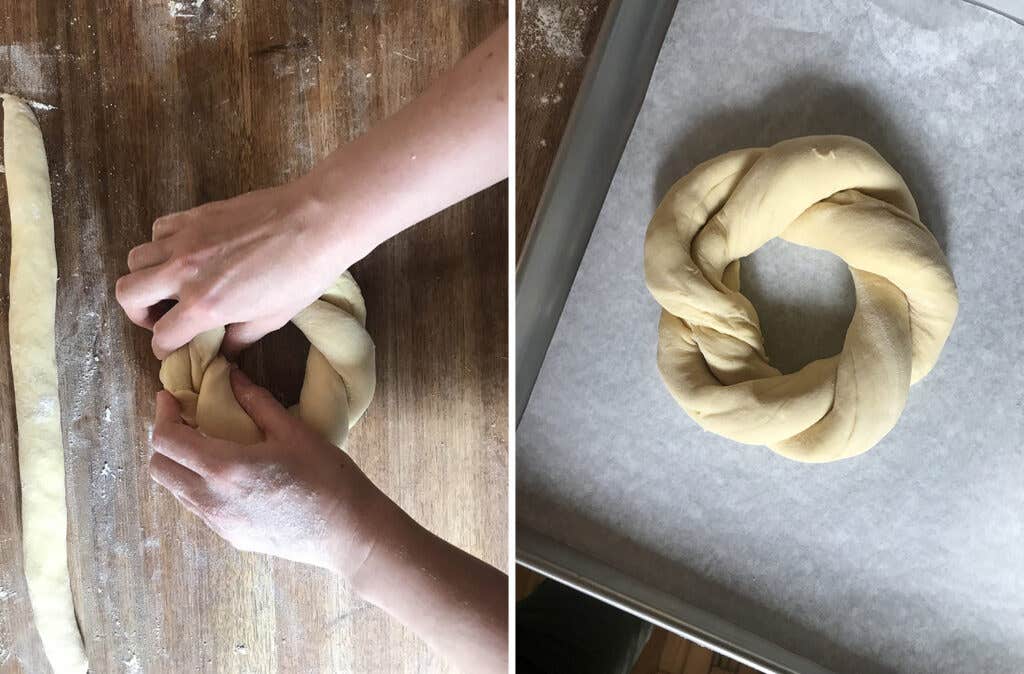
Step 4: Form Wreaths and Let Rise

Easter Bread dough circle
Pinch the ends of the coil together to make a wreath shape, tucking the ends underneath. Shape the remaining 2 ropes in the same manner. Line a large baking sheet with parchment paper. Transfer both loaves to the prepared sheet, spacing at least 5 inches apart. Nestle a whole raw egg in the center of each loaf. Loosely cover the loaves with plastic wrap and set aside to rise at room temperature until puffed and nearly doubled in size, 2–2½ hours.

Step 5: Add the Finishing Touches and Bake
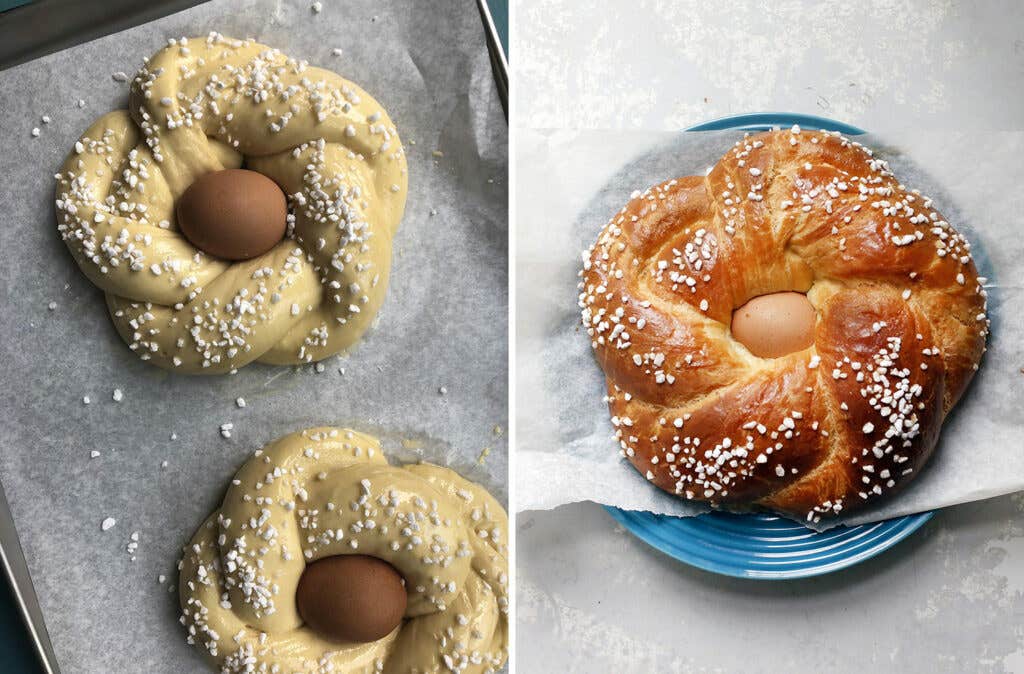
finished easter bread
Brush the tops of the loaves with egg wash, then sprinkle with pearl sugar. The egg wash helps the loaves expand better in the oven, holds the pearl sugar in place, and best of all, yields a glossier, more golden exterior. Medium-grain pearl sugar has the ideal texture for this pane de Pasqua—it’s softer than a sugar cube yet has a satisfying crunch—and makes a lovely embellishment, though it can be switched out for colorful sprinkles if you prefer. Bake in a 350°F oven until evenly golden and cooked through, 40–45 minutes. Transfer to a wire rack and let cool completely before serving.
Techniques

Master Easter Bread with This Step-by-Step Guide

Our version of the whimsical Italian Easter classic tastes as good as it looks

Kat Craddock

By Kat Craddock


Published on April 19, 2019

Easter baking in Italy means two things: savory pies and sweet breads. The pies can be filled with anything from Swiss chard to lamb to charcuterie and cheeses, but Italian Easter bread, known as pane di Pasqua, typically consists of a braided loaf with an egg peeking out. While we here at SAVEUR don't want to offend any nonne, the texture and flavor of these holiday breads often don't live up to their festive appearance. The dough either has too much yeast or sugar; or it doesn't have enough salt, eggs, or butter; or it was mixed and fermented too fast; or some combination of all of these things, yielding a loaf that's rock-hard on the outside and disappointingly dry and bland on the inside. But with the right dough, pane di Pasqua can graduate from an eye-catching centerpiece to a delicious bread in its own right. Follow the steps below to make an Easter bread that tastes as good as it looks.

Step 1: Start with Brioche Dough

Yes, we're technically using a French dough to make an Italian bread, and the recipe is adapted from an Australian bakery—the celebrated Bourke Street Bakery in Sydney—but hear us out. Brioche is in the same family as pane di Pasqua and challah but has a higher percentage of butter and eggs, yielding a pillowy, richly flavored loaf with a moist, tender crumb. Plus, the dough is super fun to work with, which is why it's the only bread I miss from my baking days. After the flour and eggs are transformed into a silky dough, a teaspoon of orange zest, almond extract, or anise seeds (or all three!) can be added at the same time as the butter, for depth of flavor. Just be sure not to go overboard with the flavorings or you'll veer into Christmas bread territory.

Step 2: Shape the Dough into Ropes

cutting and shaping easter bread dough
After fermenting the dough overnight in the refrigerator, lightly flour a large work surface. Turn the dough out onto it and divide into 4 even strips. Shape the strips into even ropes, each about 1 inch thick and 15 inches long. Each wreath will be formed using 2 ropes. Take note that the amount of flour you use can affect your results. A little bit is helpful, but if there’s too much flour on your work surface, you won't be able to use the friction against the table to extend the dough out into a nice rope. ¼ cup of flour total on your work surface and hands should be plenty.

Step 3: Twist the Ropes into Braids

twisting easter bread dough
Pinch 2 ropes together at both ends, then twist several times to make a tight coil. Make sure the dough is still cold enough: if it starts getting sticky and smearing your work surface, that means the butter is starting to melt. Throw the dough back in the fridge to firm up.

Step 4: Form Wreaths and Let Rise

Easter Bread dough circle
Pinch the ends of the coil together to make a wreath shape, tucking the ends underneath. Shape the remaining 2 ropes in the same manner. Line a large baking sheet with parchment paper. Transfer both loaves to the prepared sheet, spacing at least 5 inches apart. Nestle a whole raw egg in the center of each loaf. Loosely cover the loaves with plastic wrap and set aside to rise at room temperature until puffed and nearly doubled in size, 2–2½ hours.

Step 5: Add the Finishing Touches and Bake

finished easter bread
Brush the tops of the loaves with egg wash, then sprinkle with pearl sugar. The egg wash helps the loaves expand better in the oven, holds the pearl sugar in place, and best of all, yields a glossier, more golden exterior. Medium-grain pearl sugar has the ideal texture for this pane de Pasqua—it’s softer than a sugar cube yet has a satisfying crunch—and makes a lovely embellishment, though it can be switched out for colorful sprinkles if you prefer. Bake in a 350°F oven until evenly golden and cooked through, 40–45 minutes. Transfer to a wire rack and let cool completely before serving.

Continue to Next Story

Want more SAVEUR?

Get our favorite recipes, stories, and more delivered to your inbox.