How to Build a Gingerbread House, From Dough to Decor
Cookie queen Rebecca Firth walks us through the meditative art of making the perfect mini gingerbread house

By Rebecca Firth


Published on December 13, 2019

One of the things I strive for in a cookie is for it to be equal parts delicious and beautiful. When testing and perfecting my gingerbread cookie recipe for The Cookie Book I wanted it to be the unicorn of gingerbread cookies: a heavenly combination of spice and chew with a bit of the holidays in every bite. The natural next step for this cookie was to be transformed into a gingerbread house. Not just any gingerbread house, but a petite gingerbread house that would be easy to make, delicious to dive into to (should the mood hit) and multipurpose: is it a gift? A snack? A holiday table place-setting? Yes, yes and yes!

It is so easy to grab one of those ready-made gingerbread kits at the store, but this year I’m going have to ask you to refrain and embark on the meditative and blood-pressure-lowering activity that is gingerbread house making. Set aside a day and intertwine periods of baking, assembly and decorating with intermittent naps, magazine reading, and baths.

While we typically don't think of gingerbread assembly as relaxing, the petite-ness of this one makes it much more manageable than building say, a gingerbread highrise (save that for next year). I've broken everything down here, from how to create your own petite gingerbread house pattern to some easy decorating ideas: think stiff royal icing and pretty sprinkles. And really, what more do we need in life?

gingerbread house
A different tiny gingerbread house at each place setting makes for a precious and personalized holiday table.

Dough

Make a single batch of gingerbread dough and follow the recipe through to putting it in the fridge. Let sit in the fridge several hours (I prefer overnight). Roll out dough on parchment to between 1/4- to 1/2-inch thick, trying to make it as uniform as possible. Place in the fridge for 30 minutes or the freezer for 15 minutes.
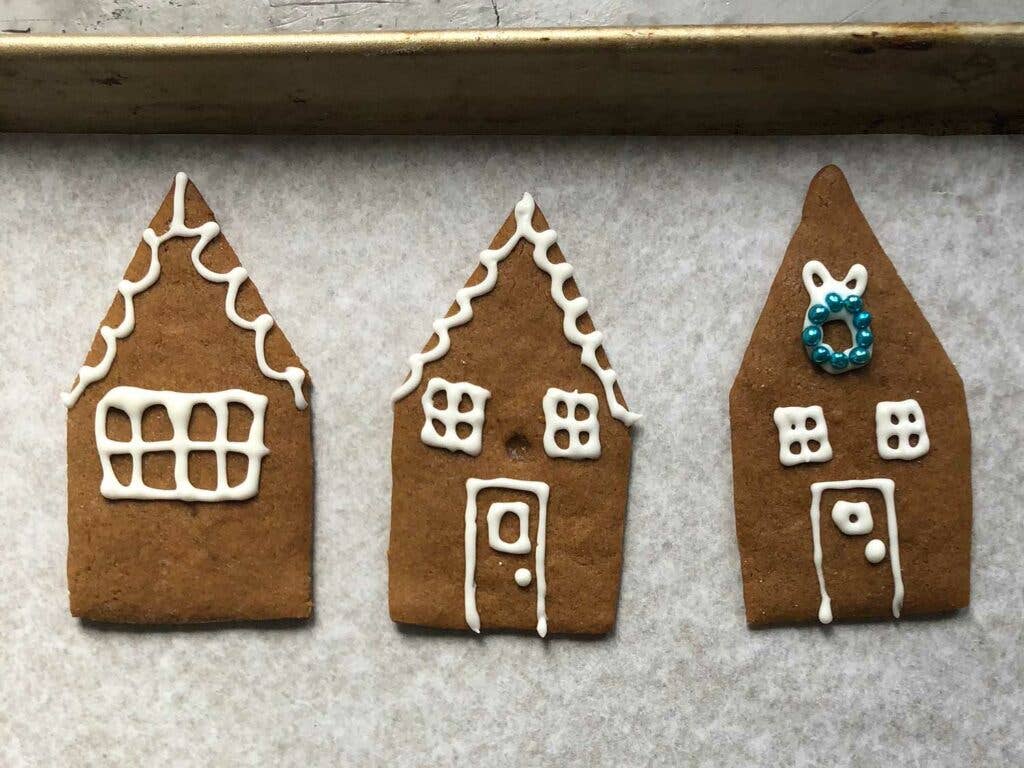
gingerbread house cutouts
To avoid drippy mishaps, decorate the walls and rooftops before assembling.

Pattern

I created my house pattern by using grid paper (the kind where 4 squares = 1 inch). I did this because you can easily download this off of the internet and you don’t need any special equipment for it.

House Dimensions

  • Sides (x2) 2 x 2 inches
  • Roof (x2) 3 x 2 ½ inches

Front/Back (x2) Is a square + triangle attached; the square is 2 x 2 inches and the attached triangle is 2 inches tall at its highest point, and then just slope down to connect it. It doesn’t have to be perfect.

The house sits atop a 4-inch circle base.

The master gingerbread recipe makes 5 of these houses; re-rolling the dough once and using the excess dough to cut out stars, chimneys or whatever kind of adornment you might be looking for.

Cutouts

Use cutouts to cut out the pieces of the houses. I liked the dough well-chilled for this step and I use an X-acto knife, which I found to be the most precise and easiest method, though you could also use a sharp paring knife. I found that as soon as the dough started to warm up, I needed to put it back in the freezer to firm up, otherwise, the pull of the knife drags and tears the dough, making for misshapen cookies. I also checked frequently to make sure there was a generous dusting of flour beneath the sheet because, with time and handling, the dough will continue to absorb the flour.

Set the cutouts on a parchment-lined baking sheet and freeze for about 10-15 minutes before baking.
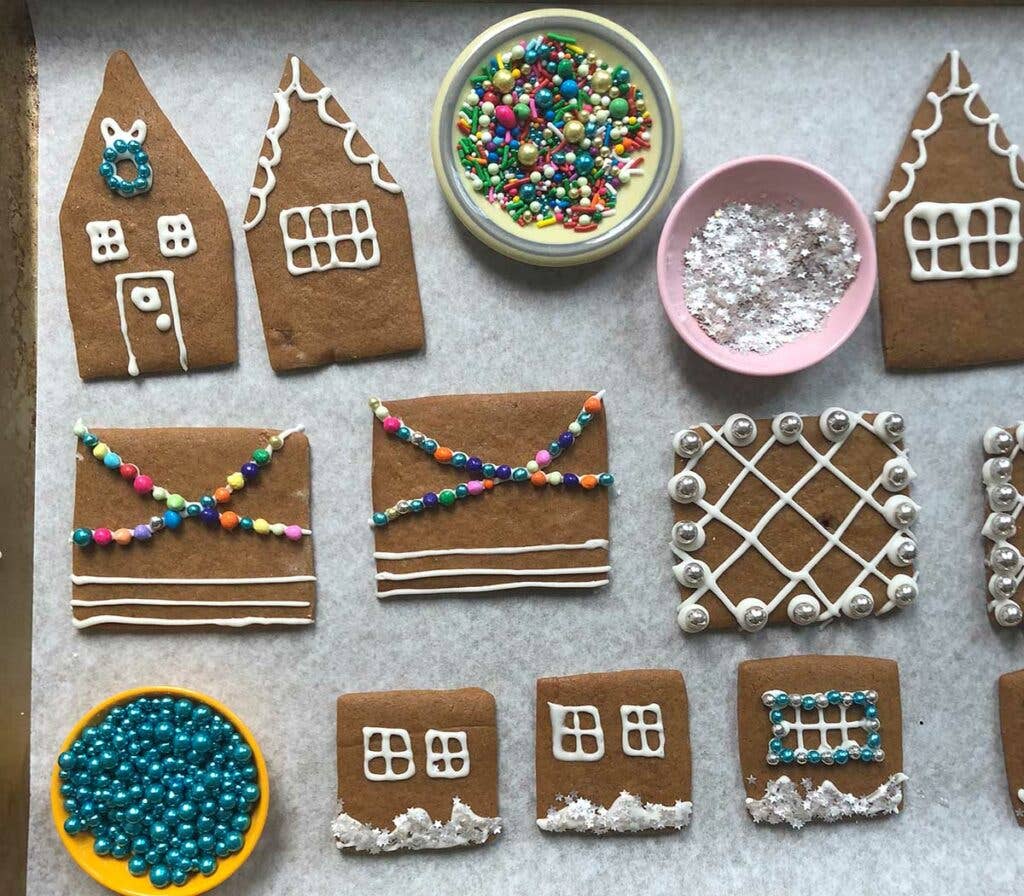
decorating gingerbread house
Be sure to give yourself plenty of time for this project; the decorations should be completely dry and set before construction begins. This royal icing will take at least an hour to dry and if you have the time, you can even let it set overnight.

Decorate

Decorate the house and then let the icing dry for at least an hour before assembling.

Assemble

Use the firmer icing to connect the walls together; let dry for an hour before putting the roof on. I found the icing was firm enough to hold everything together from the beginning, but I set jars around the house to catch anything if it starts to tilt.

RELATED: More Recipes from The Cookie Book

Base

Use the firmer icing to smear over the 4-inch cookie round…imperfect and lumpy is how I like it so that it looks like snowdrifts. I liked a small border around the edge that shows the gingerbread. Stick inverted rosemary twigs to look like Christmas trees. Dust powdered sugar over the top of the cookie round. Once the house has firmed up, set it atop the base and gently press down to set.

Roof

Put the cement icing over the top of the house and gently put the roof on top, pressing to adhere. Add another strip of the cement icing down the crack where the two roof halves meet. Let set for 1-2 hours before addisitng any additional decoration.

Techniques

How to Build a Gingerbread House, From Dough to Decor

Cookie queen Rebecca Firth walks us through the meditative art of making the perfect mini gingerbread house

By Rebecca Firth


Published on December 13, 2019

One of the things I strive for in a cookie is for it to be equal parts delicious and beautiful. When testing and perfecting my gingerbread cookie recipe for The Cookie Book I wanted it to be the unicorn of gingerbread cookies: a heavenly combination of spice and chew with a bit of the holidays in every bite. The natural next step for this cookie was to be transformed into a gingerbread house. Not just any gingerbread house, but a petite gingerbread house that would be easy to make, delicious to dive into to (should the mood hit) and multipurpose: is it a gift? A snack? A holiday table place-setting? Yes, yes and yes!

It is so easy to grab one of those ready-made gingerbread kits at the store, but this year I’m going have to ask you to refrain and embark on the meditative and blood-pressure-lowering activity that is gingerbread house making. Set aside a day and intertwine periods of baking, assembly and decorating with intermittent naps, magazine reading, and baths.

While we typically don't think of gingerbread assembly as relaxing, the petite-ness of this one makes it much more manageable than building say, a gingerbread highrise (save that for next year). I've broken everything down here, from how to create your own petite gingerbread house pattern to some easy decorating ideas: think stiff royal icing and pretty sprinkles. And really, what more do we need in life?

gingerbread house
A different tiny gingerbread house at each place setting makes for a precious and personalized holiday table.

Dough

Make a single batch of gingerbread dough and follow the recipe through to putting it in the fridge. Let sit in the fridge several hours (I prefer overnight). Roll out dough on parchment to between 1/4- to 1/2-inch thick, trying to make it as uniform as possible. Place in the fridge for 30 minutes or the freezer for 15 minutes.

gingerbread house cutouts
To avoid drippy mishaps, decorate the walls and rooftops before assembling.

Pattern

I created my house pattern by using grid paper (the kind where 4 squares = 1 inch). I did this because you can easily download this off of the internet and you don’t need any special equipment for it.

House Dimensions

  • Sides (x2) 2 x 2 inches
  • Roof (x2) 3 x 2 ½ inches

Front/Back (x2) Is a square + triangle attached; the square is 2 x 2 inches and the attached triangle is 2 inches tall at its highest point, and then just slope down to connect it. It doesn’t have to be perfect.

The house sits atop a 4-inch circle base.

The master gingerbread recipe makes 5 of these houses; re-rolling the dough once and using the excess dough to cut out stars, chimneys or whatever kind of adornment you might be looking for.

Cutouts

Use cutouts to cut out the pieces of the houses. I liked the dough well-chilled for this step and I use an X-acto knife, which I found to be the most precise and easiest method, though you could also use a sharp paring knife. I found that as soon as the dough started to warm up, I needed to put it back in the freezer to firm up, otherwise, the pull of the knife drags and tears the dough, making for misshapen cookies. I also checked frequently to make sure there was a generous dusting of flour beneath the sheet because, with time and handling, the dough will continue to absorb the flour.

Set the cutouts on a parchment-lined baking sheet and freeze for about 10-15 minutes before baking.

decorating gingerbread house
Be sure to give yourself plenty of time for this project; the decorations should be completely dry and set before construction begins. This royal icing will take at least an hour to dry and if you have the time, you can even let it set overnight.

Decorate

Decorate the house and then let the icing dry for at least an hour before assembling.

Assemble

Use the firmer icing to connect the walls together; let dry for an hour before putting the roof on. I found the icing was firm enough to hold everything together from the beginning, but I set jars around the house to catch anything if it starts to tilt.

RELATED: More Recipes from The Cookie Book

Base

Use the firmer icing to smear over the 4-inch cookie round…imperfect and lumpy is how I like it so that it looks like snowdrifts. I liked a small border around the edge that shows the gingerbread. Stick inverted rosemary twigs to look like Christmas trees. Dust powdered sugar over the top of the cookie round. Once the house has firmed up, set it atop the base and gently press down to set.

Roof

Put the cement icing over the top of the house and gently put the roof on top, pressing to adhere. Add another strip of the cement icing down the crack where the two roof halves meet. Let set for 1-2 hours before addisitng any additional decoration.

Continue to Next Story

Want more SAVEUR?

Get our favorite recipes, stories, and more delivered to your inbox.