How To Roll and Decorate a Bûche de Noël

Step-By-Step Photo Instructions for making a Buche de Noel
httpswww.saveur.comsitessaveur.comfilesimport2011images2011-117-SAV143-RollandDecorateBuche-1-400×600.jpg
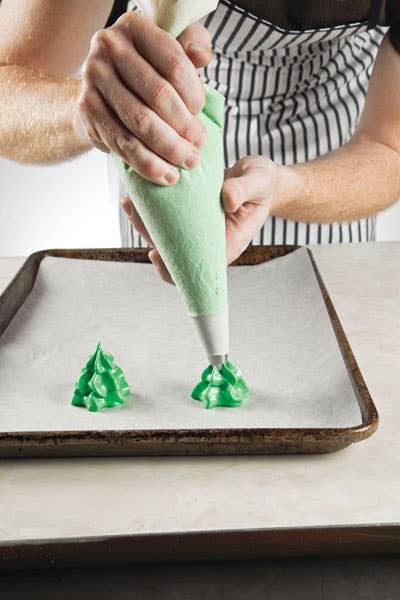
Put green meringue in a piping bag fitted with a ⅜" star tip. Start with a 1 ½"-wide star, then pipe two more stars on top of the first, each ½" smaller than the last, to form a three-tiered Christmas tree. Repeat steps to make additional trees.
httpswww.saveur.comsitessaveur.comfilesimport2011images2011-117-SAV143-RollandDecorateBuche-2-400×600.jpg
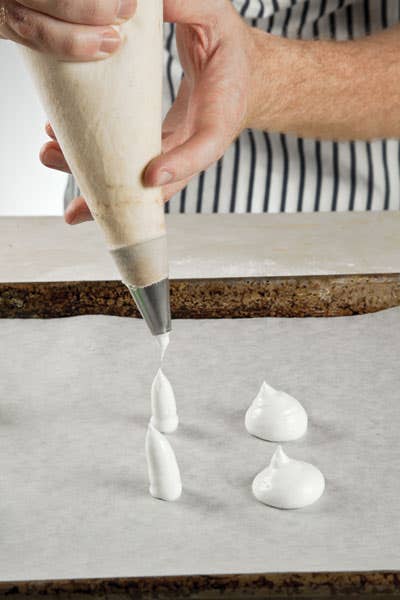
Put plain meringue in a piping bag fitted with a ⅜" round tip. Pipe several 1 ½"-wide mounds and ½" x 1 ½" sticks to form mushroom caps and stems. Once the meringue pieces have baked and cooled, fit stems into bottoms of caps.
httpswww.saveur.comsitessaveur.comfilesimport2011images2011-117-SAV143-RollandDecorateBuche-3-400×600.jpg
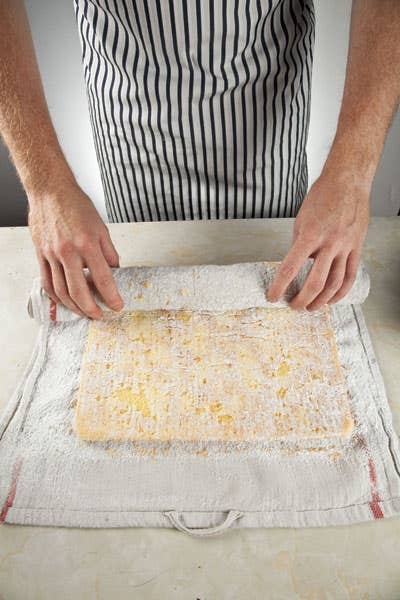
Place hot cake on a large kitchen towel dusted with confectioners' sugar; dust cake with more sugar. Starting with one narrow end, roll cake and towel together into a tight cylinder; let cool completely. Gently unroll cake.
httpswww.saveur.comsitessaveur.comfilesimport2011images2011-117-SAV143-RollandDecorateBuche-4-400×600.jpg
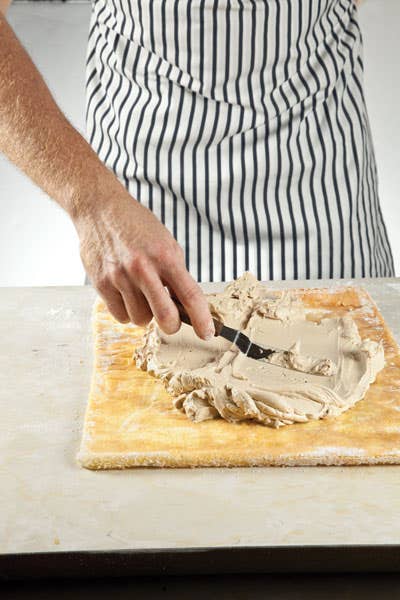
Brush rum syrup evenly over the cake with a pastry brush. Using an offset spatula, spread buttercream evenly over the cake, leaving a 1" border along the top edge so that the roll will close neatly and the buttercream will remain inside.
httpswww.saveur.comsitessaveur.comfilesimport2011images2011-117-SAV143-RollandDecorateBuche-5-400×600.jpg
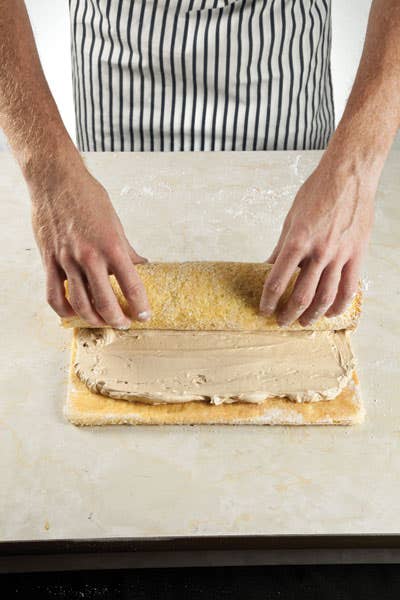
Starting with the edge nearest you, roll the cake, taking care not to apply too much pressure, so the buttercream stays inside the roll. Transfer the cake roll to a serving platter, seam side down, and chill to set.
httpswww.saveur.comsitessaveur.comfilesimport2011images2011-117-SAV143-RollandDecorateBuche-6-400×600.jpg
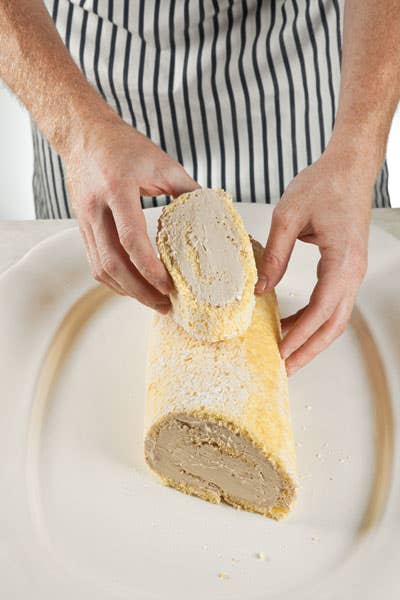
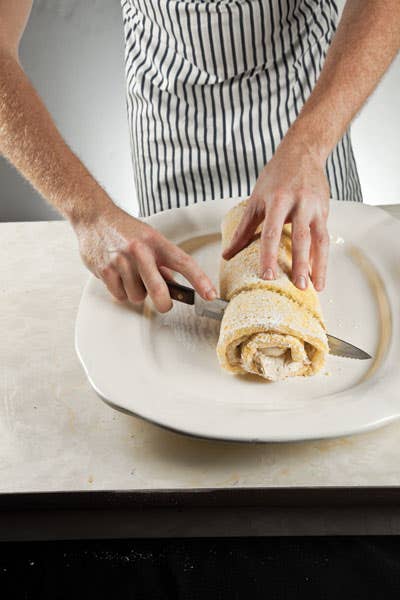
Using a serrated knife, cut 3" off one end of cake at a 30° angle. Trim other end of cake to make it flat. Remove angled end and spread its flat side with buttercream--this will help it stick to the top of the cake.
httpswww.saveur.comsitessaveur.comfilesimport2011images2011-117-SAV143-RollandDecorateBuche-7-400×600.jpg
Position the angled "stump" halfway between the center of the cake and the trimmed end so that it sits securely--frosted, flat side down--on top, to suggest the cut branch of a log.
httpswww.saveur.comsitessaveur.comfilesimport2011images2011-117-SAV143-RollandDecorateBuche-8-400×600.jpg
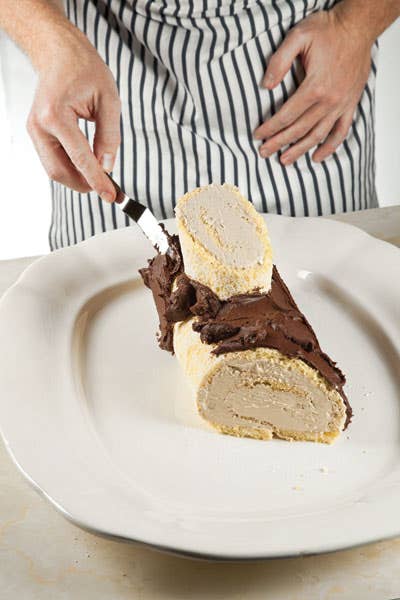
Spread ganache over the surface of the cake and the stump; leave the ends of cake and the top of the stump exposed. Run the tines of a fork along the ganache parallel to the length of cake.
Techniques

How To Roll and Decorate a Bûche de Noël

Step-By-Step Photo Instructions for making a Buche de Noel
httpswww.saveur.comsitessaveur.comfilesimport2011images2011-117-SAV143-RollandDecorateBuche-1-400×600.jpg
Put green meringue in a piping bag fitted with a ⅜" star tip. Start with a 1 ½"-wide star, then pipe two more stars on top of the first, each ½" smaller than the last, to form a three-tiered Christmas tree. Repeat steps to make additional trees.
httpswww.saveur.comsitessaveur.comfilesimport2011images2011-117-SAV143-RollandDecorateBuche-2-400×600.jpg
Put plain meringue in a piping bag fitted with a ⅜" round tip. Pipe several 1 ½"-wide mounds and ½" x 1 ½" sticks to form mushroom caps and stems. Once the meringue pieces have baked and cooled, fit stems into bottoms of caps.
httpswww.saveur.comsitessaveur.comfilesimport2011images2011-117-SAV143-RollandDecorateBuche-3-400×600.jpg
Place hot cake on a large kitchen towel dusted with confectioners' sugar; dust cake with more sugar. Starting with one narrow end, roll cake and towel together into a tight cylinder; let cool completely. Gently unroll cake.
httpswww.saveur.comsitessaveur.comfilesimport2011images2011-117-SAV143-RollandDecorateBuche-4-400×600.jpg
Brush rum syrup evenly over the cake with a pastry brush. Using an offset spatula, spread buttercream evenly over the cake, leaving a 1" border along the top edge so that the roll will close neatly and the buttercream will remain inside.
httpswww.saveur.comsitessaveur.comfilesimport2011images2011-117-SAV143-RollandDecorateBuche-5-400×600.jpg
Starting with the edge nearest you, roll the cake, taking care not to apply too much pressure, so the buttercream stays inside the roll. Transfer the cake roll to a serving platter, seam side down, and chill to set.
httpswww.saveur.comsitessaveur.comfilesimport2011images2011-117-SAV143-RollandDecorateBuche-6-400×600.jpg
Using a serrated knife, cut 3" off one end of cake at a 30° angle. Trim other end of cake to make it flat. Remove angled end and spread its flat side with buttercream--this will help it stick to the top of the cake.
httpswww.saveur.comsitessaveur.comfilesimport2011images2011-117-SAV143-RollandDecorateBuche-7-400×600.jpg
Position the angled "stump" halfway between the center of the cake and the trimmed end so that it sits securely--frosted, flat side down--on top, to suggest the cut branch of a log.
httpswww.saveur.comsitessaveur.comfilesimport2011images2011-117-SAV143-RollandDecorateBuche-8-400×600.jpg
Spread ganache over the surface of the cake and the stump; leave the ends of cake and the top of the stump exposed. Run the tines of a fork along the ganache parallel to the length of cake.

Continue to Next Story

Want more SAVEUR?

Get our favorite recipes, stories, and more delivered to your inbox.