Croissants au Beurre
Recreate Tartine’s super-flaky, all-butter breakfast pastry at home.

By Chad Robertson


Updated on July 5, 2023

The croissant is the most celebrated member of the family of butter- and sugar-enriched, yeasted pastries known as viennoiseries. They obtain their signature flaky texture through lamination, the process of coating a dough with fat and repeatedly folding and rolling it to create layers. Tartine owner Chad Robert­son insists on an unsalted, high-fat butter with at least 80 percent fat for laminating his straight-armed versions.

Recipe times may vary drastically depending on environmental factors, so be sure to mind the visual cues before moving on to the next step. If possible, use a scale to measure your ingredients and work in a cool room.

Featured in "How to Make the Best Ultra-Buttery Croissants," by Kat Craddock.

Time To Make The Dough

tartine prep process
Making the Dough

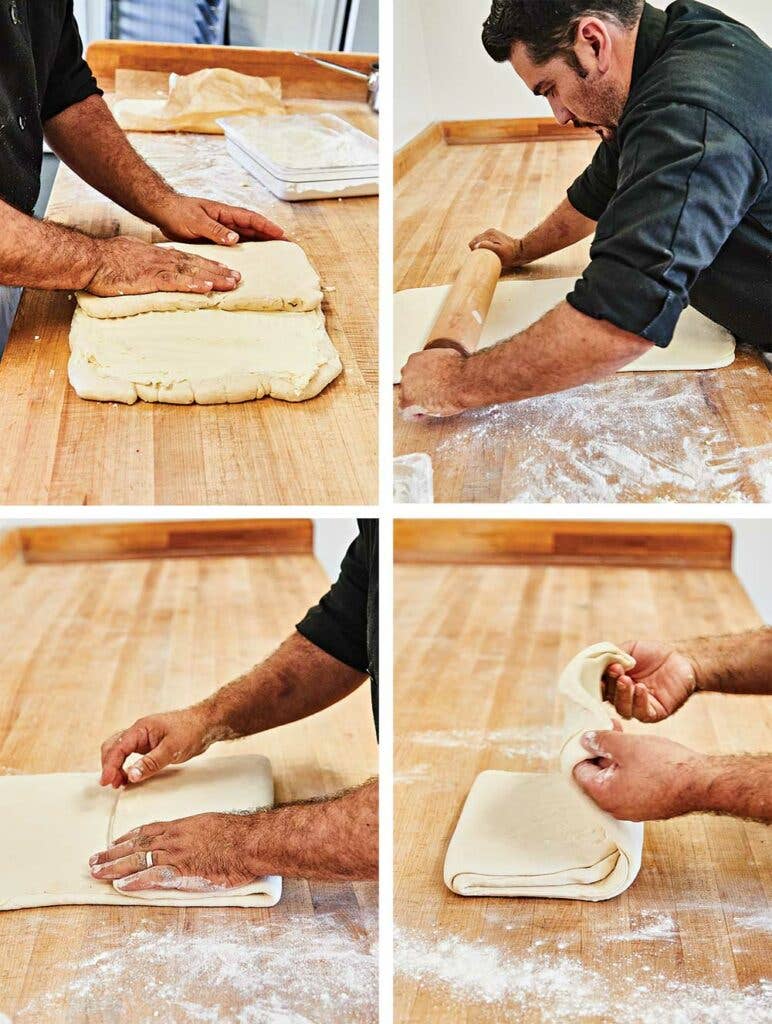
Lead viennoisier, Fausto Echeverria, uses a high-fat, European-style butter from Oregon to laminate Tartine’s croissant dough. First, a thin sheet of butter is laid on top of the dough before it is folded into thirds (1). Then, Echeverria rolls the dough out a second time (2), before folding it again in thirds like a letter (3, 4). After a short rest in the fridge, the folding process is repeated once more. The dough is then rested again for several hours to relax the gluten. After the final rest, the dough can be sheeted out and shaped into croissants, danish, and morning buns.

Ingredients

For the Preferment:

  • 34 cup (200 g) 2% milk
  • 12 tsp. (2 g) active dry yeast (not instant)
  • 1 14 cups (175 g) bread flour

For the Dough:

  • 2 tsp. (8 g) active dry yeast (not instant)
  • 1 34 cups (425 g) 2% milk
  • 5 14 cups (800 g) bread flour, plus more as needed
  • 13 cup (70 g) sugar
  • 1 tbsp. plus 1 tsp. (22 g) fine sea salt
  • 1 tbsp. (12 g) unsalted butter, melted
  • 5 sticks (585 g) high-fat unsalted butter (look for European-style brands like Plugra, President, or Kerrygold) at room temperature
  • 3 large egg yolks
  • 2 tbsp. heavy cream

Instructions

Step 1

Make the preferment: In a small saucepan over low heat, warm the milk just enough to take the chill off. (The milk should not feel warm or cold to the touch, 80°–90°.)

Step 2

Pour the milk into a large bowl, then sprinkle in the yeast and stir to dissolve. Add the flour and mix with a wooden spoon until a smooth batter forms. Cover the bowl with a clean, dry kitchen towel and let the mixture rise until almost doubled in volume, 2½–3 hours at room temperature or overnight in the refrigerator.

Step 3

Make the dough: Transfer the pre­ferment to the large bowl of a stand mixer fitted with the dough hook. Set the milk, flour, sugar, salt, and melted butter nearby. Add the yeast to the preferment and mix on low speed, stopping to scrape down the sides of the bowl and bring together the ingredients as needed, until the yeast is incorporated and the mixture is an even, well-mixed mass, about 2 minutes. Raise the speed to medium, and while mixing, slowly add half of the milk. Continue to mix until fully incorporated. Turn off the mixer, then add the flour, sugar, salt, melted butter, and the remaining half of the milk. Mix on low speed until a loose dough forms, about 2 minutes. Return the speed to medium and mix until the dough is smooth and cohesive, 2 minutes more. Remove the hook and cover the bowl with a clean, dry kitchen towel. Let rise in a cool place until the volume has increased by nearly half, about 1½ hours.

Step 4

Transfer the dough to a lightly floured work surface and form it into a rough rectangle about 2 inches thick. Wrap tightly in plastic wrap and refrigerate until chilled through, 3–4 hours.

Step 5

One hour before laminating the dough, make your butter sheet. Place a large sheet of parchment paper or plastic wrap on a work surface. Add the butter to the center in a neat pile, then cover with a second sheet. Use a rolling pin to flatten and form the butter into a 12x18½-inch rectangle, peeling back the top sheet to manipulate the butter into shape as needed. Refrigerate to lightly chill but not fully resolidify, 5–10 minutes.

Step 6

Laminate the dough: Lightly flour a work surface. Retrieve and unwrap the dough, then roll it out to a 28x12-inch rectangle. With a long side facing you, peel the top sheet away from the butter and flip it over to cover the left two-thirds of the rectangle. Peel away the other sheet. Fold the uncovered third of the dough over the butter, then fold the left-hand third over the center, as if folding a business letter. With your fingers, push down along the seams on the top and the bottom to seal in the butter. Give the dough a quarter turn so that the seams are perpendicular to you. Roll out the dough once more into a 28x12-inch rectangle, and fold again in the same manner (no need to pinch the seams again). Wrap in plastic wrap and refrigerate for 1 hour to relax the gluten in the dough.

Step 7

Clean the work surface, dust again lightly with flour, and retrieve the dough. Unwrap and again roll out into a rectangle 28x12 inches. Fold into thirds so that the rectangle measures 9x12 inches and 1½–2 inches thick. Wrap in plastic and immediately freeze on a flat surface for at least 1 hour or up to 1 week. (if frozen for more than an hour, transfer the dough to the refrigerator to thaw overnight before using in the morning.)

Step 8

Three hours before you are ready to serve, form and proof the croissants: Remove the thawed dough from the refrigerator. Line 3 baking sheets with parchment paper and set aside. Lightly dust a work surface with flour and roll into a 12x40-inch rectangle about 1⁄8 inch thick. Use a straight edge and a paring knife or pizza cutter to carefully trim 1 inch from each of the long sides; save for another use. Cut the remaining dough into 14 triangles, 4 inches at the base and 10 inches tall. Working one at a time, stretch the triangles slightly to extend them to 11 inches. Then, starting at the base, roll each tightly all the way to the tip to form an even, straight-armed croissant shape. Press slightly at the tip to adhere and to make a slightly flattened base for the croissant to rest on. Continue rolling the croissants in this manner, then transfer them, spaced evenly apart and flattened side down on the prepared baking sheets (no more than 6 croissants per baking sheet).

Step 9

Preheat the oven to 400° and set the racks at least 4 inches apart. (If you only have room for 2 racks, the croissants should be baked in 2 rounds.) Set a large, wide baking dish filled with water on the floor of the oven. Place the baking sheets in a warm, preferably humid spot and let rise until the croissants are puffed, very gassy, and about doubled in size (they should slowly spring back when poked with your fingertip and jiggle slightly like gelatin when the tray is shaken), 60–80 minutes.

Step 10

In a small bowl, beat the yolks and heavy cream. Brush the risen croissants evenly with the mixture and bake, without opening the oven, until the croissants begin to color, 20–22 minutes. Rotate the pans and continue cooking until evenly golden, 6–8 minutes more. Let cool slightly before serving.
  1. Make the preferment: In a small saucepan over low heat, warm the milk just enough to take the chill off. (The milk should not feel warm or cold to the touch, 80°–90°.)
  2. Pour the milk into a large bowl, then sprinkle in the yeast and stir to dissolve. Add the flour and mix with a wooden spoon until a smooth batter forms. Cover the bowl with a clean, dry kitchen towel and let the mixture rise until almost doubled in volume, 2½–3 hours at room temperature or overnight in the refrigerator.
  3. Make the dough: Transfer the pre­ferment to the large bowl of a stand mixer fitted with the dough hook. Set the milk, flour, sugar, salt, and melted butter nearby. Add the yeast to the preferment and mix on low speed, stopping to scrape down the sides of the bowl and bring together the ingredients as needed, until the yeast is incorporated and the mixture is an even, well-mixed mass, about 2 minutes. Raise the speed to medium, and while mixing, slowly add half of the milk. Continue to mix until fully incorporated. Turn off the mixer, then add the flour, sugar, salt, melted butter, and the remaining half of the milk. Mix on low speed until a loose dough forms, about 2 minutes. Return the speed to medium and mix until the dough is smooth and cohesive, 2 minutes more. Remove the hook and cover the bowl with a clean, dry kitchen towel. Let rise in a cool place until the volume has increased by nearly half, about 1½ hours.
  4. Transfer the dough to a lightly floured work surface and form it into a rough rectangle about 2 inches thick. Wrap tightly in plastic wrap and refrigerate until chilled through, 3–4 hours.
  5. One hour before laminating the dough, make your butter sheet. Place a large sheet of parchment paper or plastic wrap on a work surface. Add the butter to the center in a neat pile, then cover with a second sheet. Use a rolling pin to flatten and form the butter into a 12x18½-inch rectangle, peeling back the top sheet to manipulate the butter into shape as needed. Refrigerate to lightly chill but not fully resolidify, 5–10 minutes.
  6. Laminate the dough: Lightly flour a work surface. Retrieve and unwrap the dough, then roll it out to a 28x12-inch rectangle. With a long side facing you, peel the top sheet away from the butter and flip it over to cover the left two-thirds of the rectangle. Peel away the other sheet. Fold the uncovered third of the dough over the butter, then fold the left-hand third over the center, as if folding a business letter. With your fingers, push down along the seams on the top and the bottom to seal in the butter. Give the dough a quarter turn so that the seams are perpendicular to you. Roll out the dough once more into a 28x12-inch rectangle, and fold again in the same manner (no need to pinch the seams again). Wrap in plastic wrap and refrigerate for 1 hour to relax the gluten in the dough.
  7. Clean the work surface, dust again lightly with flour, and retrieve the dough. Unwrap and again roll out into a rectangle 28x12 inches. Fold into thirds so that the rectangle measures 9x12 inches and 1½–2 inches thick. Wrap in plastic and immediately freeze on a flat surface for at least 1 hour or up to 1 week. (if frozen for more than an hour, transfer the dough to the refrigerator to thaw overnight before using in the morning.)
  8. Three hours before you are ready to serve, form and proof the croissants: Remove the thawed dough from the refrigerator. Line 3 baking sheets with parchment paper and set aside. Lightly dust a work surface with flour and roll into a 12x40-inch rectangle about 1⁄8 inch thick. Use a straight edge and a paring knife or pizza cutter to carefully trim 1 inch from each of the long sides; save for another use. Cut the remaining dough into 14 triangles, 4 inches at the base and 10 inches tall. Working one at a time, stretch the triangles slightly to extend them to 11 inches. Then, starting at the base, roll each tightly all the way to the tip to form an even, straight-armed croissant shape. Press slightly at the tip to adhere and to make a slightly flattened base for the croissant to rest on. Continue rolling the croissants in this manner, then transfer them, spaced evenly apart and flattened side down on the prepared baking sheets (no more than 6 croissants per baking sheet).
  9. Preheat the oven to 400° and set the racks at least 4 inches apart. (If you only have room for 2 racks, the croissants should be baked in 2 rounds.) Set a large, wide baking dish filled with water on the floor of the oven. Place the baking sheets in a warm, preferably humid spot and let rise until the croissants are puffed, very gassy, and about doubled in size (they should slowly spring back when poked with your fingertip and jiggle slightly like gelatin when the tray is shaken), 60–80 minutes.
  10. In a small bowl, beat the yolks and heavy cream. Brush the risen croissants evenly with the mixture and bake, without opening the oven, until the croissants begin to color, 20–22 minutes. Rotate the pans and continue cooking until evenly golden, 6–8 minutes more. Let cool slightly before serving.
Recipes

Croissants au Beurre

Recreate Tartine’s super-flaky, all-butter breakfast pastry at home.

croissants
EMMA STAR JENSEN

By Chad Robertson


Updated on July 5, 2023

The croissant is the most celebrated member of the family of butter- and sugar-enriched, yeasted pastries known as viennoiseries. They obtain their signature flaky texture through lamination, the process of coating a dough with fat and repeatedly folding and rolling it to create layers. Tartine owner Chad Robert­son insists on an unsalted, high-fat butter with at least 80 percent fat for laminating his straight-armed versions.

Recipe times may vary drastically depending on environmental factors, so be sure to mind the visual cues before moving on to the next step. If possible, use a scale to measure your ingredients and work in a cool room.

Featured in "How to Make the Best Ultra-Buttery Croissants," by Kat Craddock.

Ingredients

For the Preferment:

  • 34 cup (200 g) 2% milk
  • 12 tsp. (2 g) active dry yeast (not instant)
  • 1 14 cups (175 g) bread flour

For the Dough:

  • 2 tsp. (8 g) active dry yeast (not instant)
  • 1 34 cups (425 g) 2% milk
  • 5 14 cups (800 g) bread flour, plus more as needed
  • 13 cup (70 g) sugar
  • 1 tbsp. plus 1 tsp. (22 g) fine sea salt
  • 1 tbsp. (12 g) unsalted butter, melted
  • 5 sticks (585 g) high-fat unsalted butter (look for European-style brands like Plugra, President, or Kerrygold) at room temperature
  • 3 large egg yolks
  • 2 tbsp. heavy cream

Instructions

Step 1

Make the preferment: In a small saucepan over low heat, warm the milk just enough to take the chill off. (The milk should not feel warm or cold to the touch, 80°–90°.)

Step 2

Pour the milk into a large bowl, then sprinkle in the yeast and stir to dissolve. Add the flour and mix with a wooden spoon until a smooth batter forms. Cover the bowl with a clean, dry kitchen towel and let the mixture rise until almost doubled in volume, 2½–3 hours at room temperature or overnight in the refrigerator.

Step 3

Make the dough: Transfer the pre­ferment to the large bowl of a stand mixer fitted with the dough hook. Set the milk, flour, sugar, salt, and melted butter nearby. Add the yeast to the preferment and mix on low speed, stopping to scrape down the sides of the bowl and bring together the ingredients as needed, until the yeast is incorporated and the mixture is an even, well-mixed mass, about 2 minutes. Raise the speed to medium, and while mixing, slowly add half of the milk. Continue to mix until fully incorporated. Turn off the mixer, then add the flour, sugar, salt, melted butter, and the remaining half of the milk. Mix on low speed until a loose dough forms, about 2 minutes. Return the speed to medium and mix until the dough is smooth and cohesive, 2 minutes more. Remove the hook and cover the bowl with a clean, dry kitchen towel. Let rise in a cool place until the volume has increased by nearly half, about 1½ hours.

Step 4

Transfer the dough to a lightly floured work surface and form it into a rough rectangle about 2 inches thick. Wrap tightly in plastic wrap and refrigerate until chilled through, 3–4 hours.

Step 5

One hour before laminating the dough, make your butter sheet. Place a large sheet of parchment paper or plastic wrap on a work surface. Add the butter to the center in a neat pile, then cover with a second sheet. Use a rolling pin to flatten and form the butter into a 12x18½-inch rectangle, peeling back the top sheet to manipulate the butter into shape as needed. Refrigerate to lightly chill but not fully resolidify, 5–10 minutes.

Step 6

Laminate the dough: Lightly flour a work surface. Retrieve and unwrap the dough, then roll it out to a 28x12-inch rectangle. With a long side facing you, peel the top sheet away from the butter and flip it over to cover the left two-thirds of the rectangle. Peel away the other sheet. Fold the uncovered third of the dough over the butter, then fold the left-hand third over the center, as if folding a business letter. With your fingers, push down along the seams on the top and the bottom to seal in the butter. Give the dough a quarter turn so that the seams are perpendicular to you. Roll out the dough once more into a 28x12-inch rectangle, and fold again in the same manner (no need to pinch the seams again). Wrap in plastic wrap and refrigerate for 1 hour to relax the gluten in the dough.

Step 7

Clean the work surface, dust again lightly with flour, and retrieve the dough. Unwrap and again roll out into a rectangle 28x12 inches. Fold into thirds so that the rectangle measures 9x12 inches and 1½–2 inches thick. Wrap in plastic and immediately freeze on a flat surface for at least 1 hour or up to 1 week. (if frozen for more than an hour, transfer the dough to the refrigerator to thaw overnight before using in the morning.)

Step 8

Three hours before you are ready to serve, form and proof the croissants: Remove the thawed dough from the refrigerator. Line 3 baking sheets with parchment paper and set aside. Lightly dust a work surface with flour and roll into a 12x40-inch rectangle about 1⁄8 inch thick. Use a straight edge and a paring knife or pizza cutter to carefully trim 1 inch from each of the long sides; save for another use. Cut the remaining dough into 14 triangles, 4 inches at the base and 10 inches tall. Working one at a time, stretch the triangles slightly to extend them to 11 inches. Then, starting at the base, roll each tightly all the way to the tip to form an even, straight-armed croissant shape. Press slightly at the tip to adhere and to make a slightly flattened base for the croissant to rest on. Continue rolling the croissants in this manner, then transfer them, spaced evenly apart and flattened side down on the prepared baking sheets (no more than 6 croissants per baking sheet).

Step 9

Preheat the oven to 400° and set the racks at least 4 inches apart. (If you only have room for 2 racks, the croissants should be baked in 2 rounds.) Set a large, wide baking dish filled with water on the floor of the oven. Place the baking sheets in a warm, preferably humid spot and let rise until the croissants are puffed, very gassy, and about doubled in size (they should slowly spring back when poked with your fingertip and jiggle slightly like gelatin when the tray is shaken), 60–80 minutes.

Step 10

In a small bowl, beat the yolks and heavy cream. Brush the risen croissants evenly with the mixture and bake, without opening the oven, until the croissants begin to color, 20–22 minutes. Rotate the pans and continue cooking until evenly golden, 6–8 minutes more. Let cool slightly before serving.
  1. Make the preferment: In a small saucepan over low heat, warm the milk just enough to take the chill off. (The milk should not feel warm or cold to the touch, 80°–90°.)
  2. Pour the milk into a large bowl, then sprinkle in the yeast and stir to dissolve. Add the flour and mix with a wooden spoon until a smooth batter forms. Cover the bowl with a clean, dry kitchen towel and let the mixture rise until almost doubled in volume, 2½–3 hours at room temperature or overnight in the refrigerator.
  3. Make the dough: Transfer the pre­ferment to the large bowl of a stand mixer fitted with the dough hook. Set the milk, flour, sugar, salt, and melted butter nearby. Add the yeast to the preferment and mix on low speed, stopping to scrape down the sides of the bowl and bring together the ingredients as needed, until the yeast is incorporated and the mixture is an even, well-mixed mass, about 2 minutes. Raise the speed to medium, and while mixing, slowly add half of the milk. Continue to mix until fully incorporated. Turn off the mixer, then add the flour, sugar, salt, melted butter, and the remaining half of the milk. Mix on low speed until a loose dough forms, about 2 minutes. Return the speed to medium and mix until the dough is smooth and cohesive, 2 minutes more. Remove the hook and cover the bowl with a clean, dry kitchen towel. Let rise in a cool place until the volume has increased by nearly half, about 1½ hours.
  4. Transfer the dough to a lightly floured work surface and form it into a rough rectangle about 2 inches thick. Wrap tightly in plastic wrap and refrigerate until chilled through, 3–4 hours.
  5. One hour before laminating the dough, make your butter sheet. Place a large sheet of parchment paper or plastic wrap on a work surface. Add the butter to the center in a neat pile, then cover with a second sheet. Use a rolling pin to flatten and form the butter into a 12x18½-inch rectangle, peeling back the top sheet to manipulate the butter into shape as needed. Refrigerate to lightly chill but not fully resolidify, 5–10 minutes.
  6. Laminate the dough: Lightly flour a work surface. Retrieve and unwrap the dough, then roll it out to a 28x12-inch rectangle. With a long side facing you, peel the top sheet away from the butter and flip it over to cover the left two-thirds of the rectangle. Peel away the other sheet. Fold the uncovered third of the dough over the butter, then fold the left-hand third over the center, as if folding a business letter. With your fingers, push down along the seams on the top and the bottom to seal in the butter. Give the dough a quarter turn so that the seams are perpendicular to you. Roll out the dough once more into a 28x12-inch rectangle, and fold again in the same manner (no need to pinch the seams again). Wrap in plastic wrap and refrigerate for 1 hour to relax the gluten in the dough.
  7. Clean the work surface, dust again lightly with flour, and retrieve the dough. Unwrap and again roll out into a rectangle 28x12 inches. Fold into thirds so that the rectangle measures 9x12 inches and 1½–2 inches thick. Wrap in plastic and immediately freeze on a flat surface for at least 1 hour or up to 1 week. (if frozen for more than an hour, transfer the dough to the refrigerator to thaw overnight before using in the morning.)
  8. Three hours before you are ready to serve, form and proof the croissants: Remove the thawed dough from the refrigerator. Line 3 baking sheets with parchment paper and set aside. Lightly dust a work surface with flour and roll into a 12x40-inch rectangle about 1⁄8 inch thick. Use a straight edge and a paring knife or pizza cutter to carefully trim 1 inch from each of the long sides; save for another use. Cut the remaining dough into 14 triangles, 4 inches at the base and 10 inches tall. Working one at a time, stretch the triangles slightly to extend them to 11 inches. Then, starting at the base, roll each tightly all the way to the tip to form an even, straight-armed croissant shape. Press slightly at the tip to adhere and to make a slightly flattened base for the croissant to rest on. Continue rolling the croissants in this manner, then transfer them, spaced evenly apart and flattened side down on the prepared baking sheets (no more than 6 croissants per baking sheet).
  9. Preheat the oven to 400° and set the racks at least 4 inches apart. (If you only have room for 2 racks, the croissants should be baked in 2 rounds.) Set a large, wide baking dish filled with water on the floor of the oven. Place the baking sheets in a warm, preferably humid spot and let rise until the croissants are puffed, very gassy, and about doubled in size (they should slowly spring back when poked with your fingertip and jiggle slightly like gelatin when the tray is shaken), 60–80 minutes.
  10. In a small bowl, beat the yolks and heavy cream. Brush the risen croissants evenly with the mixture and bake, without opening the oven, until the croissants begin to color, 20–22 minutes. Rotate the pans and continue cooking until evenly golden, 6–8 minutes more. Let cool slightly before serving.

Time To Make The Dough
tartine prep process
Making the Dough

Lead viennoisier, Fausto Echeverria, uses a high-fat, European-style butter from Oregon to laminate Tartine’s croissant dough. First, a thin sheet of butter is laid on top of the dough before it is folded into thirds (1). Then, Echeverria rolls the dough out a second time (2), before folding it again in thirds like a letter (3, 4). After a short rest in the fridge, the folding process is repeated once more. The dough is then rested again for several hours to relax the gluten. After the final rest, the dough can be sheeted out and shaped into croissants, danish, and morning buns.

Continue to Next Story

Want more SAVEUR?

Get our favorite recipes, stories, and more delivered to your inbox.