A Campfire Cooking Primer

If you hear "campfire cooking" and believe the best you can muster are warmed-up franks n' beans, or, on an ambitious day, weenies-on-a-stick, think again. The truth is, once you know the basics, campfire cooking is limited only to your culinary imagination. A quick tutorial on building a blaze and a sturdy cast iron skillet are all you need to begin reaping the smoky rewards of open-fire cuisine.

In Our Campfire Cooking Primer:

  • A Fire-Building Mise en Place
  • Three Types of Fires and Their Uses
  • How To Tend the Flame for Campfire Cooking
  • Essential Campfire Cooking Equipment
  • A Campfire Cookout Dinner Party Menu

A Fire-Building Mise en Place

Just as choosing the highest-quality ingredients for a recipe can make all the difference, so too, can the best campfires depend upon the kinds of materials you choose. The aim is to create enough energy with a base level of fuel (tinder) to proceed to a slightly larger level of fuel (kindling), before crowning the flame with the dense heavy fuel logs that will burn longest and hottest.

TINDER

This is a first-level fuel. Tinder is material that is small and dry, and requires the least heat and air to ignite. Any number of materials make excellent tinder, provided they are relatively shredded or fluffy, which allows for the maximum exposure to the air and ignition source. Tinder should be about as thick as a needle; our favorite sources include the curling, paper-like strips of cedar or birch bark, pine needles, dry moss, or brittle vines and brambles. Crumpled newspaper, although not as environmentally friendly, also works.

KINDLING

As soon as the tinder is glowing, it's time to move on to the kindling. No thicker than a match, or at its largest, a piece of chalk, kindling consists of twigs, large splinters of bark, pinecones, or woodchips. Although soft-wooded conifers like pine, fir, spruce, and cedar spark and burn too quickly to make good cooking logs, their keen flammability makes top-notch kindling.

FUELWOOD

The largest pieces of wood required to feed a fire, fuelwood should be about the size of your upper arm and no more. We're not talking about the fat, heavy logs you'd sit on— if the logs are extra-large, split them to a more manageable size. Logs similar in diameter and length will burn most evenly. Deciduous hardwoods, like maple, hickory, beech, oak, elm, ash, and mesquite will burn longest and hottest.

Three Types of Fires and their uses:

Now that you've collected all your materials, it's time to get the blaze going. A peek at any scouting guide will provide you with a wide range of fire-building techniques, but we favor three in particular:

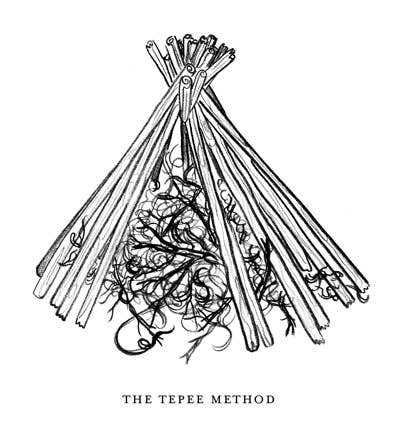
The Tepee Method
The Tepee Method

We rely on this method for a rapid flame. Because the heat is forced to a single peak, it’s an excellent choice for boiling water or quick skillet cookery. Before long, the teepee usually collapses into a mound of coals, at which point we usually begin arranging additional fuel onto the fire in an informal log-cabin style (see below).

Instructions:

1. Wedge a small, y-shaped kindling stick into the ground.
2. Make a loose ball of tinder and nestle it slackly around the stick.
3. Prop slender, short kindling around the tinder in a small tepee shape, using the y-stick for support. Leave an opening of about 8 inches through which you can light the fire.
4. Prop a second layer of wider, taller kindling around the first in the same tepee formation.
5. Create a third layer using fuelwood no thicker than your wrist and light the fire.

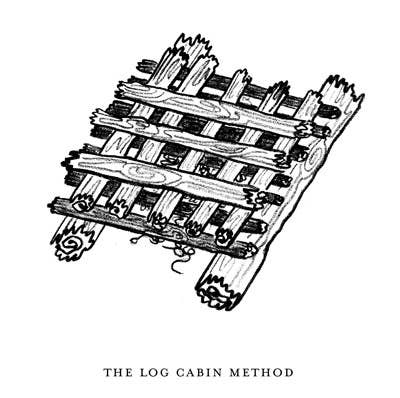
The Log Cabin Method

This fire burns hot and steady, making it good for all-purpose cooking. The elevated structure encourages the inhalation of air through the bottom opening and forces it through the top.

Instructions:

1. Place two hefty, ankle-thick fuel logs parallel to each other and eight to ten inches apart.
2. Make a loose ball of tinder and place it between the logs.
3. Lay small kindling across the logs (above the tinder). Leave about one inch between each stick for air circulation.
4. Crisscross heavier kindling on top of the first, one inch apart, for a grid-like effect.
5. Light the fire and add more fuel as needed; for example, if the tinder is spent before the kindling has caught fire, add tinder until the kindling is lit. Once the first is bright, stoke the fire with heavier fuelwood.

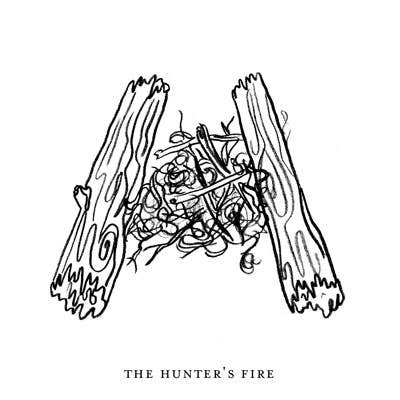
The Hunter's Fire
The Hunter's Fire

Although not used as frequently by campers, this technique is a good one for one for your sack of tricks, as its effectiveness doesn’t rely on the use of a cooking grate.

Instructions:

1. Place two hefty, ankle-thick fuel logs next to each other, six to eight inches apart at one end, and three to five inches apart at the other.
2. Make a loose ball of tinder and place it between the logs.
3. Build a small tepee fire around the tinder, between the logs.
4. Light the fire and slowly feed the tepee until it breaks into hot coals. Spread the coals in a graduated fashion to create areas of greater to lesser heat.
5. Place cookware over the fire, using the logs as a platform.

Tending the Flame for Cooking

Much of campfire cookery ultimately depends on trial-and-error, personal taste, and the whims of your surroundings (altitude, air temperature, and weather conditions). This is where cooking technique can save the day—or at least the meal. Camp cooking know-how makes improvisation possible. Here are the basics:

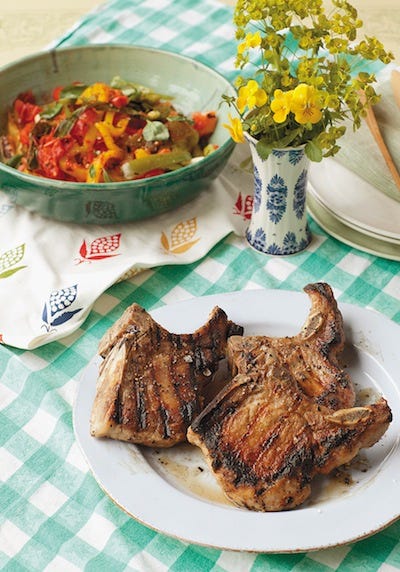
Charred Lemon-Pepper Pork Chops

This recipe for lemon-pepper pork chops is from Sarah Huck and Jaimee Young’s book Campfire Cookery: Adventuresome Recipes and Other Curiosities for the Great Outdoors (Stewart, Tabori & Chang, 2011). Serve the chops with Piperade Salad for a laid-back summer supper.

Grate Cookery

If you're setting out with a light load, a collapsible grill grate is lightweight, portable and useful for everything from sauteing potatoes in a skillet to searing steaks. Its drawback is that you cannot adjust the grate's distance from the flame, so managing the level of heat can be tricky— you will have to add or subtract fuel from the fire to achieve the desired temperature.

If you can spare the space, we recommend investing in an adjustable tripod grill. In the same way you tweak the burner on a gas stove, the tripod is equipped with a pulley and chain that enables you to drop the food closer to or further from the flame.

Ember Cookery

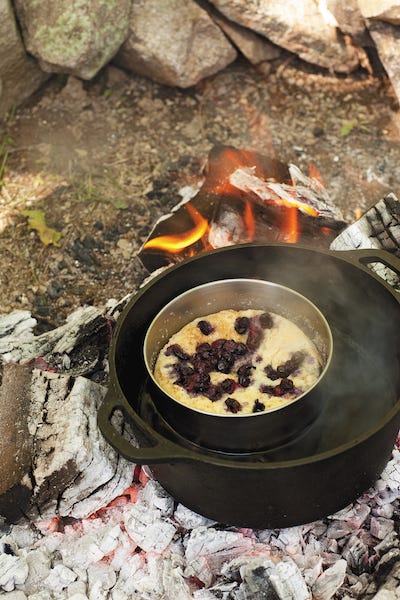
Allow a fire to burn long enough, and it will no longer require as much air to remain hot. At this stage, there will be little or no flame, but a bed of glowing, ash-covered coals and embers over which you can nestle a pot or packet of food, with additional coals heaped on top if necessary. It is an excellent way to control heat, because embers burn slowly and steadily. This method is ideal for braising, stews, foil-cookery, and baking.

Dousing the Flame

After the last plates have been scrubbed and wine glasses drained, it's time to put out the fire. We always say that even if a fire appears as dead as day-old champagne, neoclassical art, or Archduke Franz Ferdinand, it might conceal a still-vital force just waiting for some dandelion fluff to kindle it anew. To make sure your fire is well and truly out, sprinkle it with water until most of the steam has dissipated. Repeat until the telltale smoky hiss subsides. Scoop the extinguished coals and ash into a pail, and scatter the remains in the forest, or carry them home to feed your backyard garden or compost patch (they contain soil-enriching compounds).

Sarah Huck and Jaimee Young are campfire cooking experts. Their cookbook Campfire Cookery: Adventuresome Recipes and Other Curiosities for the Great Outdoors (Stewart, Tabori & Chang, 2011), is full of everything you need to know (and more!) to make the most of cooking outdoors over an open flame. They shared this menu for a campfire cookout dinner party with recipes excerpted from their cookbook.

Wild Blueberry Steamed Pudding
TARA DONNE
Culture

A Campfire Cooking Primer

By Sarah Huck and Jaimee Young


Published on August 9, 2011

If you hear "campfire cooking" and believe the best you can muster are warmed-up franks n' beans, or, on an ambitious day, weenies-on-a-stick, think again. The truth is, once you know the basics, campfire cooking is limited only to your culinary imagination. A quick tutorial on building a blaze and a sturdy cast iron skillet are all you need to begin reaping the smoky rewards of open-fire cuisine.

In Our Campfire Cooking Primer:

  • A Fire-Building Mise en Place
  • Three Types of Fires and Their Uses
  • How To Tend the Flame for Campfire Cooking
  • Essential Campfire Cooking Equipment
  • A Campfire Cookout Dinner Party Menu

A Fire-Building Mise en Place

Just as choosing the highest-quality ingredients for a recipe can make all the difference, so too, can the best campfires depend upon the kinds of materials you choose. The aim is to create enough energy with a base level of fuel (tinder) to proceed to a slightly larger level of fuel (kindling), before crowning the flame with the dense heavy fuel logs that will burn longest and hottest.

TINDER

This is a first-level fuel. Tinder is material that is small and dry, and requires the least heat and air to ignite. Any number of materials make excellent tinder, provided they are relatively shredded or fluffy, which allows for the maximum exposure to the air and ignition source. Tinder should be about as thick as a needle; our favorite sources include the curling, paper-like strips of cedar or birch bark, pine needles, dry moss, or brittle vines and brambles. Crumpled newspaper, although not as environmentally friendly, also works.

KINDLING

As soon as the tinder is glowing, it's time to move on to the kindling. No thicker than a match, or at its largest, a piece of chalk, kindling consists of twigs, large splinters of bark, pinecones, or woodchips. Although soft-wooded conifers like pine, fir, spruce, and cedar spark and burn too quickly to make good cooking logs, their keen flammability makes top-notch kindling.

FUELWOOD

The largest pieces of wood required to feed a fire, fuelwood should be about the size of your upper arm and no more. We're not talking about the fat, heavy logs you'd sit on— if the logs are extra-large, split them to a more manageable size. Logs similar in diameter and length will burn most evenly. Deciduous hardwoods, like maple, hickory, beech, oak, elm, ash, and mesquite will burn longest and hottest.

Three Types of Fires and their uses:

Now that you've collected all your materials, it's time to get the blaze going. A peek at any scouting guide will provide you with a wide range of fire-building techniques, but we favor three in particular:

The Tepee Method
The Tepee Method

We rely on this method for a rapid flame. Because the heat is forced to a single peak, it’s an excellent choice for boiling water or quick skillet cookery. Before long, the teepee usually collapses into a mound of coals, at which point we usually begin arranging additional fuel onto the fire in an informal log-cabin style (see below).

Instructions:

1. Wedge a small, y-shaped kindling stick into the ground.
2. Make a loose ball of tinder and nestle it slackly around the stick.
3. Prop slender, short kindling around the tinder in a small tepee shape, using the y-stick for support. Leave an opening of about 8 inches through which you can light the fire.
4. Prop a second layer of wider, taller kindling around the first in the same tepee formation.
5. Create a third layer using fuelwood no thicker than your wrist and light the fire.

The Log Cabin Method

This fire burns hot and steady, making it good for all-purpose cooking. The elevated structure encourages the inhalation of air through the bottom opening and forces it through the top.

Instructions:

1. Place two hefty, ankle-thick fuel logs parallel to each other and eight to ten inches apart.
2. Make a loose ball of tinder and place it between the logs.
3. Lay small kindling across the logs (above the tinder). Leave about one inch between each stick for air circulation.
4. Crisscross heavier kindling on top of the first, one inch apart, for a grid-like effect.
5. Light the fire and add more fuel as needed; for example, if the tinder is spent before the kindling has caught fire, add tinder until the kindling is lit. Once the first is bright, stoke the fire with heavier fuelwood.

The Hunter's Fire
The Hunter's Fire

Although not used as frequently by campers, this technique is a good one for one for your sack of tricks, as its effectiveness doesn’t rely on the use of a cooking grate.

Instructions:

1. Place two hefty, ankle-thick fuel logs next to each other, six to eight inches apart at one end, and three to five inches apart at the other.
2. Make a loose ball of tinder and place it between the logs.
3. Build a small tepee fire around the tinder, between the logs.
4. Light the fire and slowly feed the tepee until it breaks into hot coals. Spread the coals in a graduated fashion to create areas of greater to lesser heat.
5. Place cookware over the fire, using the logs as a platform.

Tending the Flame for Cooking

Much of campfire cookery ultimately depends on trial-and-error, personal taste, and the whims of your surroundings (altitude, air temperature, and weather conditions). This is where cooking technique can save the day—or at least the meal. Camp cooking know-how makes improvisation possible. Here are the basics:

Charred Lemon-Pepper Pork Chops

This recipe for lemon-pepper pork chops is from Sarah Huck and Jaimee Young’s book Campfire Cookery: Adventuresome Recipes and Other Curiosities for the Great Outdoors (Stewart, Tabori & Chang, 2011). Serve the chops with Piperade Salad for a laid-back summer supper.

Grate Cookery

If you're setting out with a light load, a collapsible grill grate is lightweight, portable and useful for everything from sauteing potatoes in a skillet to searing steaks. Its drawback is that you cannot adjust the grate's distance from the flame, so managing the level of heat can be tricky— you will have to add or subtract fuel from the fire to achieve the desired temperature.

If you can spare the space, we recommend investing in an adjustable tripod grill. In the same way you tweak the burner on a gas stove, the tripod is equipped with a pulley and chain that enables you to drop the food closer to or further from the flame.

Ember Cookery

Allow a fire to burn long enough, and it will no longer require as much air to remain hot. At this stage, there will be little or no flame, but a bed of glowing, ash-covered coals and embers over which you can nestle a pot or packet of food, with additional coals heaped on top if necessary. It is an excellent way to control heat, because embers burn slowly and steadily. This method is ideal for braising, stews, foil-cookery, and baking.

Dousing the Flame

After the last plates have been scrubbed and wine glasses drained, it's time to put out the fire. We always say that even if a fire appears as dead as day-old champagne, neoclassical art, or Archduke Franz Ferdinand, it might conceal a still-vital force just waiting for some dandelion fluff to kindle it anew. To make sure your fire is well and truly out, sprinkle it with water until most of the steam has dissipated. Repeat until the telltale smoky hiss subsides. Scoop the extinguished coals and ash into a pail, and scatter the remains in the forest, or carry them home to feed your backyard garden or compost patch (they contain soil-enriching compounds).

Sarah Huck and Jaimee Young are campfire cooking experts. Their cookbook Campfire Cookery: Adventuresome Recipes and Other Curiosities for the Great Outdoors (Stewart, Tabori & Chang, 2011), is full of everything you need to know (and more!) to make the most of cooking outdoors over an open flame. They shared this menu for a campfire cookout dinner party with recipes excerpted from their cookbook.

Continue to Next Story

Want more SAVEUR?

Get our favorite recipes, stories, and more delivered to your inbox.