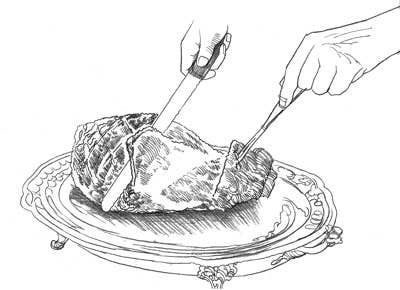
A whole, bone-in ham, like the ones called for in our recipes, makes for a magnificent holiday roast, but many home cooks shy away from a whole bone-in cut because they think that carving around the bone, which runs the length of a ham from the narrow shank end all the way to the thick butt end, is not worth the effort. Though it's not as simple as slicing a boneless ham, it isn't hard to produce elegant slices from a whole ham. The six steps below are easy to master.
1. Carve 1⁄4" of meat off bottom of ham so that it will sit flat when flipped over. Flip ham. Working about 4" from shank end, make a vertical cut down to the bone.
2. Make a 45-degree diagonal cut about 2" away from the first cut to make a V. Carve to the bone to release the wedge of ham.
3. Working at the same angle as the initial diagonal cut, begin making even, 1⁄8"-thick slices, cutting to the bone and working your way toward the thick end.
4. Transfer slices to a platter as you go, continuing to carve at a diagonal until you've reached about a third of the way to the thick end of the roast.
5. Now begin carving at a new angle, slicing from the side of the ham closest to you inward toward the center of ham and down to the bone to create thin half slices.
6. Repeat the above step on the opposite side of the ham, then switch back, until you have released most of the meat from the bone.
Keep Reading
Continue to Next Story


