Filone

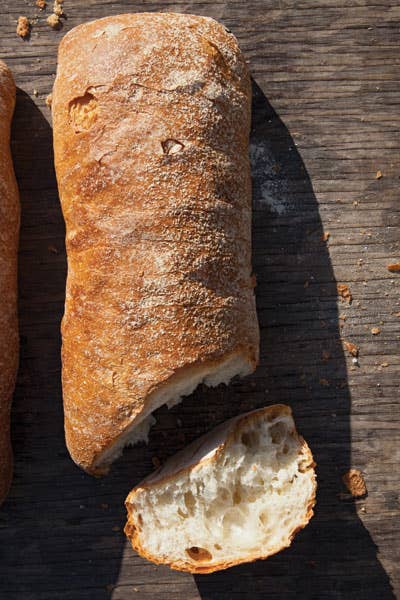
This recipe, from Daniel Leader of Bread Alone, which has several locations in upstate New York, produces an airy loaf with a nice crust similar to a ciabatta. It's made with a lightly fermented traditional Italian starter, called a_biga,_ that's started nine hours before baking. It first appeared in our May 2012 issue along with William Alexander's story American Bread.

httpswww.saveur.comsitessaveur.comfilesimport2012images2012-047-Filone_Collage_400.jpg

In this recipe from Daniel Leader of Bread Alone, an airy loaf with a nice crust is produced similar to a ciabatta. It’s made with a lightly fermented traditional Italian starter, called a biga, that’s started nine hours before baking.

Ingredients

  • 1 23 cups (13 1/4 oz.) tap water, heated to 115°
  • 1 12 tsp. (1/4 oz.) active dry yeast
  • 3 14 cups plus 2/3 cup (1 lb. 1 2/3 oz.) all–purpose flour, plus more for dusting
  • 13 cup (2 2/3 oz.) olive oil, plus more for greasing bowl
  • 2 14 tsp. (3/4 oz.) kosher salt
  • 12 cup ice cubes

Instructions

Step 1

In a medium bowl, whisk together ⅓ cup water and ½ tsp. yeast; let sit until foamy, about 10 minutes. Add ⅔ cup flour, and mix until a smooth dough forms. Transfer to a lightly floured surface, and knead until fairly smooth, about 2 minutes. Transfer the ball of dough to a greased bowl, and cover with plastic wrap. Place bowl in a cold oven, and let sit for 1 hour; transfer bowl to refrigerator, and let sit for at least 8 hours or up to 24 hours to ferment. This ball of dough is the biga, a quick and simple starter that imparts large bubbles and a lightly fermented flavor to the dough. Remove biga from refrigerator, and let sit to come to room temperature, about 30 minutes.

Step 2

Transfer biga to a large bowl and add remaining 1 ⅓ cups water and 1 tsp. yeast (Figure A); stir until biga breaks up and is partly dissolved in water. Add remaining 3 ¼ cups flour, along with oil and salt (Figure B), and stir until dough forms. Let the dough sit to allow flour to hydrate, about 20 minutes (the term for this process is called autolysis).

Step 3

Knead dough, which will be very wet and sticky, in the bowl until it begins to tighten and becomes smooth, about 4 minutes. (The dough for this bread must be very wet to achieve its light and airy texture.) Transfer the dough to a lightly floured work surface, and continue kneading (Figure C), using a bench scraper to help if necessary, until smooth and elastic, about 6 minutes more. At this point, the dough will be sticky to the touch but will release from your hands fairly easily. It will also have formed a tight skin on the outside that can hold its shape when stretched lightly (Figure D).

Step 4

Transfer the dough ball to a lightly greased bowl, and cover it with plastic wrap. Place the bowl in a cold oven, and let the dough rest until it doubles in size, about 2 hours. (When you press your finger into the dough, the fingerprint should spring back slowly. Lightly dust a sheet of parchment paper with flour, and set it on a rimless baking sheet.)

Step 5

Lightly dust a work surface with flour, and transfer dough to work surface. Using a bench scraper or a chef's knife, cut dough into two equal–sized pieces, and flatten slightly. Fold the top and bottom edges of one piece toward the middle, and flatten dough at the seam with the palm of your hand (Figure E); turn dough over, seam side down, and shape into a 12″ log. Transfer log to the prepared, floured parchment paper, and repeat this folding and shaping procedure with remaining dough piece. Lift the parchment paper between the loaves slightly. Loosely cover dough logs on baking sheet with plastic wrap, and transfer to a cold oven; let sit until dough logs double in size, about 90 minutes. (Because the temperature in kitchens can vary wildly, thus speeding up or slowing down a dough's rise, placing the dough in a cold oven keeps the temperature more constant.)

Step 6

Remove proofed loaves on baking sheet from oven, and place a cast–iron skillet on the bottom rack of oven; position another rack above skillet, and place a baking stone on top of it. Heat oven to 425°.

Step 7

Uncover dough logs, and sprinkle with flour (Figure F); this looks aesthetically pleasing and adds another dimension of flavor from the toasted flour. Using the corner of the parchment paper as a guide, slide the loaves, still on the paper, onto the baking stone; and position evenly on the stone. Place ice cubes in skillet (this produces steam that allows the loaves to rise fully before a crust forms on the exterior). Bake loaves until dark golden brown and crisp, about 50 minutes; let cool before serving.
  1. In a medium bowl, whisk together ⅓ cup water and ½ tsp. yeast; let sit until foamy, about 10 minutes. Add ⅔ cup flour, and mix until a smooth dough forms. Transfer to a lightly floured surface, and knead until fairly smooth, about 2 minutes. Transfer the ball of dough to a greased bowl, and cover with plastic wrap. Place bowl in a cold oven, and let sit for 1 hour; transfer bowl to refrigerator, and let sit for at least 8 hours or up to 24 hours to ferment. This ball of dough is the biga, a quick and simple starter that imparts large bubbles and a lightly fermented flavor to the dough. Remove biga from refrigerator, and let sit to come to room temperature, about 30 minutes.
  2. Transfer biga to a large bowl and add remaining 1 ⅓ cups water and 1 tsp. yeast (Figure A); stir until biga breaks up and is partly dissolved in water. Add remaining 3 ¼ cups flour, along with oil and salt (Figure B), and stir until dough forms. Let the dough sit to allow flour to hydrate, about 20 minutes (the term for this process is called autolysis).
  3. Knead dough, which will be very wet and sticky, in the bowl until it begins to tighten and becomes smooth, about 4 minutes. (The dough for this bread must be very wet to achieve its light and airy texture.) Transfer the dough to a lightly floured work surface, and continue kneading (Figure C), using a bench scraper to help if necessary, until smooth and elastic, about 6 minutes more. At this point, the dough will be sticky to the touch but will release from your hands fairly easily. It will also have formed a tight skin on the outside that can hold its shape when stretched lightly (Figure D).
  4. Transfer the dough ball to a lightly greased bowl, and cover it with plastic wrap. Place the bowl in a cold oven, and let the dough rest until it doubles in size, about 2 hours. (When you press your finger into the dough, the fingerprint should spring back slowly. Lightly dust a sheet of parchment paper with flour, and set it on a rimless baking sheet.)
  5. Lightly dust a work surface with flour, and transfer dough to work surface. Using a bench scraper or a chef's knife, cut dough into two equal–sized pieces, and flatten slightly. Fold the top and bottom edges of one piece toward the middle, and flatten dough at the seam with the palm of your hand (Figure E); turn dough over, seam side down, and shape into a 12″ log. Transfer log to the prepared, floured parchment paper, and repeat this folding and shaping procedure with remaining dough piece. Lift the parchment paper between the loaves slightly. Loosely cover dough logs on baking sheet with plastic wrap, and transfer to a cold oven; let sit until dough logs double in size, about 90 minutes. (Because the temperature in kitchens can vary wildly, thus speeding up or slowing down a dough's rise, placing the dough in a cold oven keeps the temperature more constant.)
  6. Remove proofed loaves on baking sheet from oven, and place a cast–iron skillet on the bottom rack of oven; position another rack above skillet, and place a baking stone on top of it. Heat oven to 425°.
  7. Uncover dough logs, and sprinkle with flour (Figure F); this looks aesthetically pleasing and adds another dimension of flavor from the toasted flour. Using the corner of the parchment paper as a guide, slide the loaves, still on the paper, onto the baking stone; and position evenly on the stone. Place ice cubes in skillet (this produces steam that allows the loaves to rise fully before a crust forms on the exterior). Bake loaves until dark golden brown and crisp, about 50 minutes; let cool before serving.
Recipes

Filone

Filone
TODD COLEMAN

This recipe, from Daniel Leader of Bread Alone, which has several locations in upstate New York, produces an airy loaf with a nice crust similar to a ciabatta. It's made with a lightly fermented traditional Italian starter, called a_biga,_ that's started nine hours before baking. It first appeared in our May 2012 issue along with William Alexander's story American Bread.

httpswww.saveur.comsitessaveur.comfilesimport2012images2012-047-Filone_Collage_400.jpg

Ingredients

  • 1 23 cups (13 1/4 oz.) tap water, heated to 115°
  • 1 12 tsp. (1/4 oz.) active dry yeast
  • 3 14 cups plus 2/3 cup (1 lb. 1 2/3 oz.) all–purpose flour, plus more for dusting
  • 13 cup (2 2/3 oz.) olive oil, plus more for greasing bowl
  • 2 14 tsp. (3/4 oz.) kosher salt
  • 12 cup ice cubes

Instructions

Step 1

In a medium bowl, whisk together ⅓ cup water and ½ tsp. yeast; let sit until foamy, about 10 minutes. Add ⅔ cup flour, and mix until a smooth dough forms. Transfer to a lightly floured surface, and knead until fairly smooth, about 2 minutes. Transfer the ball of dough to a greased bowl, and cover with plastic wrap. Place bowl in a cold oven, and let sit for 1 hour; transfer bowl to refrigerator, and let sit for at least 8 hours or up to 24 hours to ferment. This ball of dough is the biga, a quick and simple starter that imparts large bubbles and a lightly fermented flavor to the dough. Remove biga from refrigerator, and let sit to come to room temperature, about 30 minutes.

Step 2

Transfer biga to a large bowl and add remaining 1 ⅓ cups water and 1 tsp. yeast (Figure A); stir until biga breaks up and is partly dissolved in water. Add remaining 3 ¼ cups flour, along with oil and salt (Figure B), and stir until dough forms. Let the dough sit to allow flour to hydrate, about 20 minutes (the term for this process is called autolysis).

Step 3

Knead dough, which will be very wet and sticky, in the bowl until it begins to tighten and becomes smooth, about 4 minutes. (The dough for this bread must be very wet to achieve its light and airy texture.) Transfer the dough to a lightly floured work surface, and continue kneading (Figure C), using a bench scraper to help if necessary, until smooth and elastic, about 6 minutes more. At this point, the dough will be sticky to the touch but will release from your hands fairly easily. It will also have formed a tight skin on the outside that can hold its shape when stretched lightly (Figure D).

Step 4

Transfer the dough ball to a lightly greased bowl, and cover it with plastic wrap. Place the bowl in a cold oven, and let the dough rest until it doubles in size, about 2 hours. (When you press your finger into the dough, the fingerprint should spring back slowly. Lightly dust a sheet of parchment paper with flour, and set it on a rimless baking sheet.)

Step 5

Lightly dust a work surface with flour, and transfer dough to work surface. Using a bench scraper or a chef's knife, cut dough into two equal–sized pieces, and flatten slightly. Fold the top and bottom edges of one piece toward the middle, and flatten dough at the seam with the palm of your hand (Figure E); turn dough over, seam side down, and shape into a 12″ log. Transfer log to the prepared, floured parchment paper, and repeat this folding and shaping procedure with remaining dough piece. Lift the parchment paper between the loaves slightly. Loosely cover dough logs on baking sheet with plastic wrap, and transfer to a cold oven; let sit until dough logs double in size, about 90 minutes. (Because the temperature in kitchens can vary wildly, thus speeding up or slowing down a dough's rise, placing the dough in a cold oven keeps the temperature more constant.)

Step 6

Remove proofed loaves on baking sheet from oven, and place a cast–iron skillet on the bottom rack of oven; position another rack above skillet, and place a baking stone on top of it. Heat oven to 425°.

Step 7

Uncover dough logs, and sprinkle with flour (Figure F); this looks aesthetically pleasing and adds another dimension of flavor from the toasted flour. Using the corner of the parchment paper as a guide, slide the loaves, still on the paper, onto the baking stone; and position evenly on the stone. Place ice cubes in skillet (this produces steam that allows the loaves to rise fully before a crust forms on the exterior). Bake loaves until dark golden brown and crisp, about 50 minutes; let cool before serving.
  1. In a medium bowl, whisk together ⅓ cup water and ½ tsp. yeast; let sit until foamy, about 10 minutes. Add ⅔ cup flour, and mix until a smooth dough forms. Transfer to a lightly floured surface, and knead until fairly smooth, about 2 minutes. Transfer the ball of dough to a greased bowl, and cover with plastic wrap. Place bowl in a cold oven, and let sit for 1 hour; transfer bowl to refrigerator, and let sit for at least 8 hours or up to 24 hours to ferment. This ball of dough is the biga, a quick and simple starter that imparts large bubbles and a lightly fermented flavor to the dough. Remove biga from refrigerator, and let sit to come to room temperature, about 30 minutes.
  2. Transfer biga to a large bowl and add remaining 1 ⅓ cups water and 1 tsp. yeast (Figure A); stir until biga breaks up and is partly dissolved in water. Add remaining 3 ¼ cups flour, along with oil and salt (Figure B), and stir until dough forms. Let the dough sit to allow flour to hydrate, about 20 minutes (the term for this process is called autolysis).
  3. Knead dough, which will be very wet and sticky, in the bowl until it begins to tighten and becomes smooth, about 4 minutes. (The dough for this bread must be very wet to achieve its light and airy texture.) Transfer the dough to a lightly floured work surface, and continue kneading (Figure C), using a bench scraper to help if necessary, until smooth and elastic, about 6 minutes more. At this point, the dough will be sticky to the touch but will release from your hands fairly easily. It will also have formed a tight skin on the outside that can hold its shape when stretched lightly (Figure D).
  4. Transfer the dough ball to a lightly greased bowl, and cover it with plastic wrap. Place the bowl in a cold oven, and let the dough rest until it doubles in size, about 2 hours. (When you press your finger into the dough, the fingerprint should spring back slowly. Lightly dust a sheet of parchment paper with flour, and set it on a rimless baking sheet.)
  5. Lightly dust a work surface with flour, and transfer dough to work surface. Using a bench scraper or a chef's knife, cut dough into two equal–sized pieces, and flatten slightly. Fold the top and bottom edges of one piece toward the middle, and flatten dough at the seam with the palm of your hand (Figure E); turn dough over, seam side down, and shape into a 12″ log. Transfer log to the prepared, floured parchment paper, and repeat this folding and shaping procedure with remaining dough piece. Lift the parchment paper between the loaves slightly. Loosely cover dough logs on baking sheet with plastic wrap, and transfer to a cold oven; let sit until dough logs double in size, about 90 minutes. (Because the temperature in kitchens can vary wildly, thus speeding up or slowing down a dough's rise, placing the dough in a cold oven keeps the temperature more constant.)
  6. Remove proofed loaves on baking sheet from oven, and place a cast–iron skillet on the bottom rack of oven; position another rack above skillet, and place a baking stone on top of it. Heat oven to 425°.
  7. Uncover dough logs, and sprinkle with flour (Figure F); this looks aesthetically pleasing and adds another dimension of flavor from the toasted flour. Using the corner of the parchment paper as a guide, slide the loaves, still on the paper, onto the baking stone; and position evenly on the stone. Place ice cubes in skillet (this produces steam that allows the loaves to rise fully before a crust forms on the exterior). Bake loaves until dark golden brown and crisp, about 50 minutes; let cool before serving.

Continue to Next Story

Want more SAVEUR?

Get our favorite recipes, stories, and more delivered to your inbox.